本系列教程已整理至 Github,在线阅读地址:transformers.run
通过第一部分的介绍,我们已经对 Transformers 库有了基本的了解,并且上手微调了一个句子对分类模型。从本章开始,我们将通过一系列的实例向大家展示如何使用 Transformers 库来完成目前主流的 NLP 任务。
在开始之前,我们先回顾一下在《模型与分词器》中已经介绍过的分词器 (Tokenizer),进一步了解分词器的一些高级功能。
1. 快速分词器
前面我们已经介绍过如何使用分词器将文本编码为 token IDs,以及反过来将 token IDs 解码回文本。
实际上,Hugging Face 共提供了两种分分词器:
- 慢速分词器:Transformers 库自带,使用 Python 编写;
- 快速分词器:Tokenizers 库提供,使用 Rust 编写。
特别地,快速分词器除了能进行编码和解码之外,还能够追踪原文到 token 之间的映射,这对于处理序列标注、自动问答等任务非常重要。
快速分词器只有在并行处理大量文本时才能发挥出速度优势,在处理单个句子时甚至可能慢于慢速分词器。
我们一直推荐使用的 AutoTokenizer 类除了能根据 checkpoint 自动加载对应分词器以外,默认就会选择快速分词器,因此在大部分情况下都应该使用 AutoTokenizer 类来加载分词器。
再看分词结果
其实,分词器返回的是 BatchEncoding 对象,它是基于 Python 字典的子类,因此我们之前可以像字典一样来解析分词结果。我们可以通过 Tokenizer 或 BatchEncoding 对象的 is_fast 属性来判断使用的是哪种分词器:
from transformers import AutoTokenizer

tokenizer = AutoTokenizer.from_pretrained("bert-base-cased")
example = "Hello world!"
encoding = tokenizer(example)
print(type(encoding))
print('tokenizer.is_fast:', tokenizer.is_fast)
print('encoding.is_fast:', encoding.is_fast)
<class 'transformers.tokenization_utils_base.BatchEncoding'>
tokenizer.is_fast: True
encoding.is_fast: True
对于快速分词器,BatchEncoding 对象还提供了一些额外的方法。例如,我们可以直接通过 tokens() 函数来获取切分出的 token:
from transformers import AutoTokenizer

tokenizer = AutoTokenizer.from_pretrained("bert-base-cased")
example = "My name is Sylvain and I work at Hugging Face in Brooklyn."
encoding = tokenizer(example)
print(encoding.tokens())
['[CLS]', 'My', 'name', 'is', 'S', '##yl', '##va', '##in', 'and', 'I', 'work', 'at', 'Hu', '##gging', 'Face', 'in', 'Brooklyn', '.', '[SEP]']
追踪映射
在上面的例子中,索引为 5 的 token 是“##yl”,它是词语“Sylvain”的一个部分,因此在映射回原文时不应该被单独看待。我们可以通过 word_ids() 函数来获取每一个 token 对应的词语索引:
print(encoding.word_ids())
[None, 0, 1, 2, 3, 3, 3, 3, 4, 5, 6, 7, 8, 8, 9, 10, 11, 12, None]
可以看到,特殊 token [CLS] 和 [SEP] 被映射到 None,其他 token 都被映射到对应的来源词语。这可以为很多任务提供帮助,例如对于序列标注任务,就可以运用这个映射将词语的标签转换到 token 的标签;对于遮蔽语言建模 (Masked Language Modeling, MLM),就可以实现全词遮盖 (whole word masking),将属于同一个词语的 token 全部遮盖掉。
注意:词语索引取决于模型对于 word 的定义,例如“I’ll”到底算是一个词语还是两个词语,与分词器采用的预分词 (pre-tokenization) 操作有关。一些分词器直接采用空格切分,因此”I’ll“会被视为一个词语,还有一些分词器会进一步按照标点符号进行切分,那么 ‘I’ll’ 就会被视为两个词语。
快速分词器通过偏移量列表追踪文本、词语和 token 之间的映射,因此可以很容易地在这三者之间互相转换:
-
词语/token $\Rightarrow$ 文本:通过
word_to_chars()、token_to_chars()函数来实现,返回词语/token 在原文中的起始和结束偏移量。例如,前面例子中索引为 5 的 token 是 ‘##yl’,它对应的词语索引为 3,因此我们可以方便的从从原文中抽取出对应的 token 片段和词语片段:
token_index = 5
print('the 5th token is:', encoding.tokens()[token_index])
start, end = encoding.token_to_chars(token_index)
print('corresponding text span is:', example[start:end])
word_index = encoding.word_ids()[token_index] # 3
start, end = encoding.word_to_chars(word_index)
print('corresponding word span is:', example[start:end])
the 5th token is: ##yl corresponding text span is: yl corresponding word span is: Sylvain -
词语 $\Leftrightarrow$ token:前面的例子中我们使用
word_ids()获取了整个 token 序列对应的词语索引。实际上,词语和 token 之间可以直接通过索引直接映射,分别通过token_to_word()和word_to_tokens()来实现:token_index = 5 print('the 5th token is:', encoding.tokens()[token_index]) corresp_word_index = encoding.token_to_word(token_index) print('corresponding word index is:', corresp_word_index) start, end = encoding.word_to_chars(corresp_word_index) print('the word is:', example[start:end]) start, end = encoding.word_to_tokens(corresp_word_index) print('corresponding tokens are:', encoding.tokens()[start:end])the 5th token is: ##yl corresponding word index is: 3 the word is: Sylvain corresponding tokens are: ['S', '##yl', '##va', '##in'] -
文本 $\Rightarrow$ 词语/token:通过
char_to_word()和char_to_token()方法来实现:chars = 'My name is Sylvain' print('characters of "{}" ars: {}'.format(chars, list(chars))) print('corresponding word index: ') for i, c in enumerate(chars): print('"{}": {} '.format(c, encoding.char_to_word(i)), end="") print('\ncorresponding token index: ') for i, c in enumerate(chars): print('"{}": {} '.format(c, encoding.char_to_token(i)), end="")characters of "My name is Sylvain" ars: ['M', 'y', ' ', 'n', 'a', 'm', 'e', ' ', 'i', 's', ' ', 'S', 'y', 'l', 'v', 'a', 'i', 'n'] corresponding word index: "M": 0 "y": 0 " ": None "n": 1 "a": 1 "m": 1 "e": 1 " ": None "i": 2 "s": 2 " ": None "S": 3 "y": 3 "l": 3 "v": 3 "a": 3 "i": 3 "n": 3 corresponding token index: "M": 1 "y": 1 " ": None "n": 2 "a": 2 "m": 2 "e": 2 " ": None "i": 3 "s": 3 " ": None "S": 4 "y": 5 "l": 5 "v": 6 "a": 6 "i": 7 "n": 7由于空格会被 BERT 的分词器过滤掉,因此对应的词语或 token 索引都为 None。
下面,我们将以序列标注和问答任务为例,展示如何在实际任务中运用快速分词器。
2. 序列标注任务
在《开箱即用的 pipelines》中我们已经介绍过,序列标注任务在 Transformers 库中被称为 token 分类任务,典型的如命名实体识别 (NER),负责识别出文本中哪些片段是实体。
pipeline 的输出
前面我们讲过,NER pipeline 模型实际上封装了三个过程:
- 对文本进行编码;
- 将输入送入模型;
- 对模型输出进行后处理。
前两个步骤在所有 pipeline 模型中都是一样的,只有第三个步骤——对模型输出进行后处理,则是根据任务类型而不同。token 分类 pipeline 模型在默认情况下会加载 dbmdz/bert-large-cased-finetuned-conll03-english NER 模型,我们直接打印出它的输出:
from transformers import pipeline

token_classifier = pipeline("token-classification")
results = token_classifier("My name is Sylvain and I work at Hugging Face in Brooklyn.")
print(results)
[{'entity': 'I-PER', 'score': 0.99938285, 'index': 4, 'word': 'S', 'start': 11, 'end': 12},
 {'entity': 'I-PER', 'score': 0.99815494, 'index': 5, 'word': '##yl', 'start': 12, 'end': 14},
 {'entity': 'I-PER', 'score': 0.99590707, 'index': 6, 'word': '##va', 'start': 14, 'end': 16},
 {'entity': 'I-PER', 'score': 0.99923277, 'index': 7, 'word': '##in', 'start': 16, 'end': 18},
 {'entity': 'I-ORG', 'score': 0.9738931, 'index': 12, 'word': 'Hu', 'start': 33, 'end': 35},
 {'entity': 'I-ORG', 'score': 0.976115, 'index': 13, 'word': '##gging', 'start': 35, 'end': 40},
 {'entity': 'I-ORG', 'score': 0.9887976, 'index': 14, 'word': 'Face', 'start': 41, 'end': 45},
 {'entity': 'I-LOC', 'score': 0.9932106, 'index': 16, 'word': 'Brooklyn', 'start': 49, 'end': 57}]
可以看到,模型成功地将“Sylvain”对应的 token 识别为人物,“Hugging Face”对应的 token 识别为机构,以及“Brooklyn”识别为地点。我们还可以通过设置参数 grouped_entities=True 让模型自动合属于同一个实体的 token:
from transformers import pipeline

token_classifier = pipeline("token-classification", grouped_entities=True)
results = token_classifier("My name is Sylvain and I work at Hugging Face in Brooklyn.")
print(results)
[{'entity_group': 'PER', 'score': 0.9981694, 'word': 'Sylvain', 'start': 11, 'end': 18},
 {'entity_group': 'ORG', 'score': 0.9796019, 'word': 'Hugging Face', 'start': 33, 'end': 45},
 {'entity_group': 'LOC', 'score': 0.9932106, 'word': 'Brooklyn', 'start': 49, 'end': 57}]
实际上,NER pipeline 模型提供了多种组合 token 形成实体的策略,可以通过 aggregation_strategy 参数进行设置:
- simple:默认策略,以实体对应所有 token 的平均分数作为得分,例如“Sylvain”的分数就是“S”、“##yl”、“##va”和“##in”四个 token 分数的平均;
- first:将第一个 token 的分数作为实体的分数,例如“Sylvain”的分数就是 token “S”的分数;
- max:将 token 中最大的分数作为整个实体的分数;
- average:对应词语(注意不是 token)的平均分数作为整个实体的分数,例如“Hugging Face”就是“Hugging”(0.975)和 “Face”(0.98879)的平均值 0.9819,而 simple 策略得分为 0.9796。
from transformers import pipeline

token_classifier = pipeline("token-classification", aggregation_strategy="max")
results = token_classifier("My name is Sylvain and I work at Hugging Face in Brooklyn.")
print(results)
[{'entity_group': 'PER', 'score': 0.99938285, 'word': 'Sylvain', 'start': 11, 'end': 18},
 {'entity_group': 'ORG', 'score': 0.9824563, 'word': 'Hugging Face', 'start': 33, 'end': 45},
 {'entity_group': 'LOC', 'score': 0.9932106, 'word': 'Brooklyn', 'start': 49, 'end': 57}]
构造模型输出
下面,我们将通过 AutoModelForTokenClassification 类来构造一个 token 分类模型,并且手工地对模型的输出进行后处理,获得与 pipeline 模型相同的结果。这里我们同样将 checkpoint 设为 dbmdz/bert-large-cased-finetuned-conll03-english:
from transformers import AutoTokenizer, AutoModelForTokenClassification

model_checkpoint = "dbmdz/bert-large-cased-finetuned-conll03-english"
tokenizer = AutoTokenizer.from_pretrained(model_checkpoint)
model = AutoModelForTokenClassification.from_pretrained(model_checkpoint)

example = "My name is Sylvain and I work at Hugging Face in Brooklyn."
inputs = tokenizer(example, return_tensors="pt")
outputs = model(**inputs)

print(inputs["input_ids"].shape)
print(outputs.logits.shape)
torch.Size([1, 19])
torch.Size([1, 19, 9])
可以看到,模型的输入是一个长度为 $19$ 的 token 序列,输出尺寸为 $1 \times 19 \times 9$,即模型对每个 token 都会输出一个包含 9 个 logits 值的向量(9 分类)。我们可以通过 model.config.id2label 属性来查看这 9 个标签:
print(model.config.id2label)
{0: 'O', 1: 'B-MISC', 2: 'I-MISC', 3: 'B-PER', 4: 'I-PER', 5: 'B-ORG', 6: 'I-ORG', 7: 'B-LOC', 8: 'I-LOC'}
这里使用的是 IOB 标签格式,“B-XXX”表示某一种标签的开始,“I-XXX”表示某一种标签的中间,“O”表示非标签。因此,该模型识别的实体类型共有 4 种:miscellaneous、person、organization 和 location。
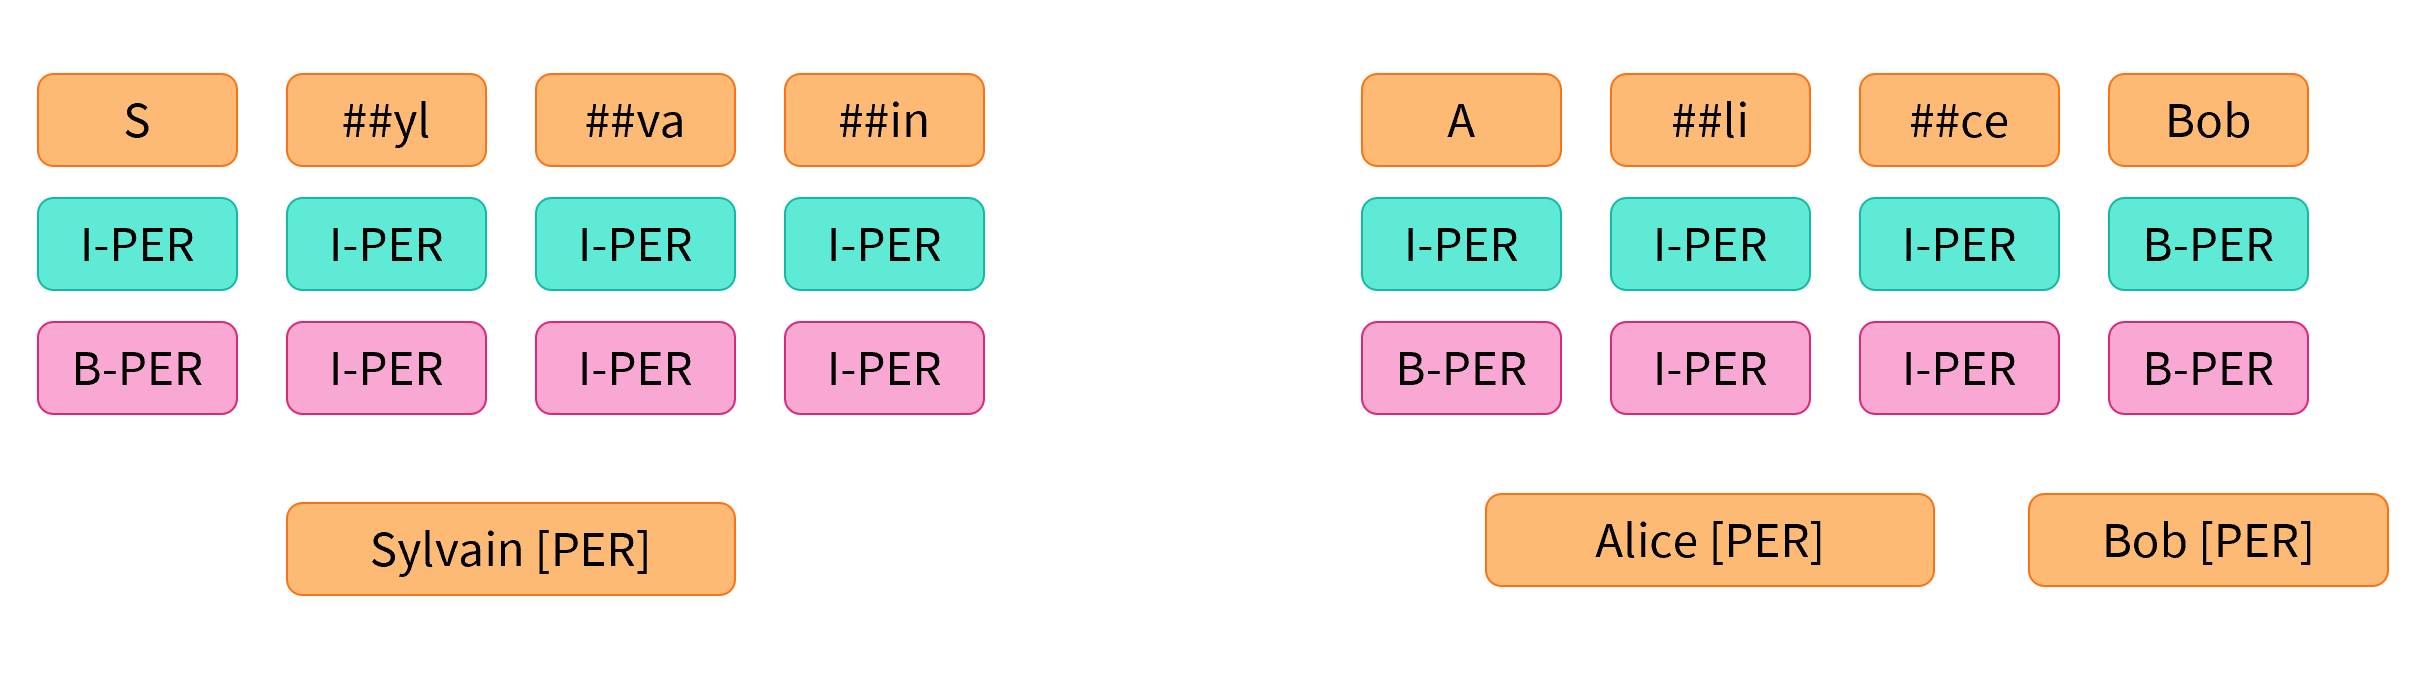
在实际应用中, IOB 标签格式又分为两种:
- IOB1:如上图绿色所示,只有在分隔类别相同的连续 token 时才会使用 B-XXX 标签,例如右图中的“Alice”和“Bob”是连续的两个人物,因此“Bob”的起始 token 标签为“B-PER”,而“Alice”的起始 token 为“I-PER”;
- IOB2:如上图粉色所示,不管任何情况下,起始 token 的标签都为“B-XXX”,后续 token 的标签都为“I-XXX”,因此右图中“Alice”和“Bob”的起始 token 都为“B-PER”。
从 pipeline 的输出结果可以看到,模型采用的是 IOB1 格式,因此“Sylvain”对应的 4 个 token “S”、“##yl”、“##va”和“##in”预测的标签都为“I-PER”。
与文本分类任务一样,我们可以通过 softmax 函数进一步将 logits 值转换为概率值,并且通过 argmax 函数来获取每一个 token 的预测结果:
from transformers import AutoTokenizer, AutoModelForTokenClassification

model_checkpoint = "dbmdz/bert-large-cased-finetuned-conll03-english"
tokenizer = AutoTokenizer.from_pretrained(model_checkpoint)
model = AutoModelForTokenClassification.from_pretrained(model_checkpoint)

example = "My name is Sylvain and I work at Hugging Face in Brooklyn."
inputs = tokenizer(example, return_tensors="pt")
outputs = model(**inputs)

import torch

probabilities = torch.nn.functional.softmax(outputs.logits, dim=-1)[0].tolist()
predictions = outputs.logits.argmax(dim=-1)[0].tolist()
print(predictions)

results = []
tokens = inputs.tokens()

for idx, pred in enumerate(predictions):
    label = model.config.id2label[pred]
    if label != "O":
        results.append(
            {"entity": label, "score": probabilities[idx][pred], "word": tokens[idx]}
        )

print(results)
[0, 0, 0, 0, 4, 4, 4, 4, 0, 0, 0, 0, 6, 6, 6, 0, 8, 0, 0]
[{'entity': 'I-PER', 'score': 0.9993828535079956, 'word': 'S'},
 {'entity': 'I-PER', 'score': 0.9981549382209778, 'word': '##yl'},
 {'entity': 'I-PER', 'score': 0.995907187461853, 'word': '##va'},
 {'entity': 'I-PER', 'score': 0.9992327690124512, 'word': '##in'},
 {'entity': 'I-ORG', 'score': 0.9738931059837341, 'word': 'Hu'},
 {'entity': 'I-ORG', 'score': 0.9761149883270264, 'word': '##gging'},
 {'entity': 'I-ORG', 'score': 0.9887976050376892, 'word': 'Face'},
 {'entity': 'I-LOC', 'score': 0.9932106137275696, 'word': 'Brooklyn'}]
可以看到,这样就已经和 pipeline 模型的输出非常相似了,只不过 pipeline 模型还会返回 token 或者组合实体在原文中的起始和结束位置。
前面我们已经介绍过,快速分词器可以追踪从文本到 token 的映射,只需要给分词器传递 return_offsets_mapping=True 参数,就可以获取从 token 到原文的映射(特殊 token 对应的原文位置为 (0, 0)。):
inputs_with_offsets = tokenizer(example, return_offsets_mapping=True)
offset_mapping = inputs_with_offsets["offset_mapping"]
print(offset_mapping)
[(0, 0), (0, 2), (3, 7), (8, 10), (11, 12), (12, 14), (14, 16), (16, 18), (19, 22), (23, 24), (25, 29), (30, 32), (33, 35), (35, 40), (41, 45), (46, 48), (49, 57), (57, 58), (0, 0)]
借助于这个映射,我们可以进一步完善模型的输出结果:
from transformers import AutoTokenizer, AutoModelForTokenClassification

model_checkpoint = "dbmdz/bert-large-cased-finetuned-conll03-english"
tokenizer = AutoTokenizer.from_pretrained(model_checkpoint)
model = AutoModelForTokenClassification.from_pretrained(model_checkpoint)

example = "My name is Sylvain and I work at Hugging Face in Brooklyn."
inputs = tokenizer(example, return_tensors="pt")
outputs = model(**inputs)

import torch

probabilities = torch.nn.functional.softmax(outputs.logits, dim=-1)[0].tolist()
predictions = outputs.logits.argmax(dim=-1)[0].tolist()

results = []
inputs_with_offsets = tokenizer(example, return_offsets_mapping=True)
tokens = inputs_with_offsets.tokens()
offsets = inputs_with_offsets["offset_mapping"]

for idx, pred in enumerate(predictions):
    label = model.config.id2label[pred]
    if label != "O":
        start, end = offsets[idx]
        results.append(
            {
                "entity": label,
                "score": probabilities[idx][pred],
                "word": tokens[idx],
                "start": start,
                "end": end,
            }
        )

print(results)
[{'entity': 'I-PER', 'score': 0.9993828535079956, 'word': 'S', 'start': 11, 'end': 12},
 {'entity': 'I-PER', 'score': 0.9981549382209778, 'word': '##yl', 'start': 12, 'end': 14},
 {'entity': 'I-PER', 'score': 0.995907187461853, 'word': '##va', 'start': 14, 'end': 16},
 {'entity': 'I-PER', 'score': 0.9992327690124512, 'word': '##in', 'start': 16, 'end': 18},
 {'entity': 'I-ORG', 'score': 0.9738931059837341, 'word': 'Hu', 'start': 33, 'end': 35},
 {'entity': 'I-ORG', 'score': 0.9761149883270264, 'word': '##gging', 'start': 35, 'end': 40},
 {'entity': 'I-ORG', 'score': 0.9887976050376892, 'word': 'Face', 'start': 41, 'end': 45},
 {'entity': 'I-LOC', 'score': 0.9932106137275696, 'word': 'Brooklyn', 'start': 49, 'end': 57}]
这样我们手工构建的结果就与 pipeline 的输出完全一致了!只需要再实现组合实体功能就完成所有的后处理步骤了。
组合实体
我们以前面介绍的 simple 合并策略为例,将连续的标签为“I-XXX”的多个 token 进行合并(或者以“B-XXX”开头,后面接多个“I-XXX”的 token 序列),直到遇到
- “O”:表示该 token 为非实体;
- “B-XXX”或“I-YYY”或“B-YYY”:表示出现了新的实体。
然后对组合后 token 的概率值求平均作为实体的分数:
from transformers import AutoTokenizer, AutoModelForTokenClassification

model_checkpoint = "dbmdz/bert-large-cased-finetuned-conll03-english"
tokenizer = AutoTokenizer.from_pretrained(model_checkpoint)
model = AutoModelForTokenClassification.from_pretrained(model_checkpoint)

example = "My name is Sylvain and I work at Hugging Face in Brooklyn."
inputs = tokenizer(example, return_tensors="pt")
outputs = model(**inputs)

import torch

probabilities = torch.nn.functional.softmax(outputs.logits, dim=-1)[0].tolist()
predictions = outputs.logits.argmax(dim=-1)[0].tolist()

import numpy as np

results = []
inputs_with_offsets = tokenizer(example, return_offsets_mapping=True)
tokens = inputs_with_offsets.tokens()
offsets = inputs_with_offsets["offset_mapping"]

idx = 0
while idx < len(predictions):
    pred = predictions[idx]
    label = model.config.id2label[pred]
    if label != "O":
        label = label[2:] # Remove the B- or I-
        start, end = offsets[idx]
        all_scores = [probabilities[idx][pred]]
        # Grab all the tokens labeled with I-label
        while (
            idx + 1 < len(predictions)
            and model.config.id2label[predictions[idx + 1]] == f"I-{label}"
        ):
            all_scores.append(probabilities[idx + 1][predictions[idx + 1]])
            _, end = offsets[idx + 1]
            idx += 1

        score = np.mean(all_scores).item()
        word = example[start:end]
        results.append(
            {
                "entity_group": label,
                "score": score,
                "word": word,
                "start": start,
                "end": end,
            }
        )
    idx += 1

print(results)
[{'entity_group': 'PER', 'score': 0.9981694370508194, 'word': 'Sylvain', 'start': 11, 'end': 18},
 {'entity_group': 'ORG', 'score': 0.9796018997828165, 'word': 'Hugging Face', 'start': 33, 'end': 45},
 {'entity_group': 'LOC', 'score': 0.9932106137275696, 'word': 'Brooklyn', 'start': 49, 'end': 57}]
这样我们就得到了与 pipeline 模型完全一致的组合实体预测结果。
3. 抽取式问答任务
除了序列标注以外,抽取式问答是另一个需要使用到分词器高级功能的任务。与 NER 任务类似,自动问答需要根据问题从原文中标记(抽取)出答案片段。
pipeline 的输出
同样地,我们首先通过 QA pipeline 模型来完成问答任务:
from transformers import pipeline

question_answerer = pipeline("question-answering")
context = """
Transformers is backed by the three most popular deep learning libraries — Jax, PyTorch, and TensorFlow — with a seamless integration between them. It's straightforward to train your models with one before loading them for inference with the other.
"""
question = "Which deep learning libraries back Transformers?"
results = question_answerer(question=question, context=context)
print(results)
{'score': 0.9741130471229553, 'start': 76, 'end': 104, 'answer': 'Jax, PyTorch, and TensorFlow'}
可以看到 pipeline 会输出答案片段的概率、文本以及在原文中的位置。下面我们将手工构建 QA 模型,并且通过对输出进行处理获得与 pipeline 一样的结果。
构造模型输出
我们首先通过 AutoModelForQuestionAnswering 类来手工构建一个问答模型,并且将 checkpoint 设为 distilbert-base-cased-distilled-squad。按照模型预训练时的输入格式,我们将问题和上下文通过特殊分隔符 [SEP] 连接成一个整体,如下图所示:

标准的问答模型会使用两个指针分别预测答案片段的起始 token 和结束 token 的索引(例子中分别是 21 和 24)。因此,模型会返回两个张量,分别对应答案起始 token 和结束 token 的 logits 值:
from transformers import AutoTokenizer, AutoModelForQuestionAnswering

model_checkpoint = "distilbert-base-cased-distilled-squad"
tokenizer = AutoTokenizer.from_pretrained(model_checkpoint)
model = AutoModelForQuestionAnswering.from_pretrained(model_checkpoint)

context = """
Transformers is backed by the three most popular deep learning libraries — Jax, PyTorch, and TensorFlow — with a seamless integration between them. It's straightforward to train your models with one before loading them for inference with the other.
"""
question = "Which deep learning libraries back Transformers?"

inputs = tokenizer(question, context, return_tensors="pt")
outputs = model(**inputs)

print(inputs["input_ids"].shape)

start_logits = outputs.start_logits
end_logits = outputs.end_logits
print(start_logits.shape, end_logits.shape)
torch.Size([1, 65])
torch.Size([1, 65]) torch.Size([1, 65])
在上面的例子中,因为模型的输入包含 $65$ 个 token,所以输出也是两个长度为 $65$ 的张量。同样地,我们也可以通过 softmax 函数将这些 logits 值转换为概率值。
注意!因为答案是在上下文中抽取,所以在计算前我们需要先排除掉输入中那些不属于上下文的 token 索引。
我们的输入格式为“$\texttt{[CLS]} \text{ question } \texttt{[SEP]} \text{ context } \texttt{[SEP]}$”,所以需要构建 Mask 遮蔽掉问题文本以及 $\texttt{[SEP]}$。
考虑到某些模型使用 $\texttt{[CLS]}$ 来标记答案是否在上下文中,这里我们会保留 $\texttt{[CLS]}$。
下面我们手工构建一个 Mask 张量,将需要遮盖 token 索引的 logits 值替换为一个大的负值(例如 -10000),然后再应用 softmax 函数:
from transformers import AutoTokenizer, AutoModelForQuestionAnswering

model_checkpoint = "distilbert-base-cased-distilled-squad"
tokenizer = AutoTokenizer.from_pretrained(model_checkpoint)
model = AutoModelForQuestionAnswering.from_pretrained(model_checkpoint)

context = """
Transformers is backed by the three most popular deep learning libraries — Jax, PyTorch, and TensorFlow — with a seamless integration between them. It's straightforward to train your models with one before loading them for inference with the other.
"""
question = "Which deep learning libraries back Transformers?"

inputs = tokenizer(question, context, return_tensors="pt")
outputs = model(**inputs)

start_logits = outputs.start_logits
end_logits = outputs.end_logits

import torch

sequence_ids = inputs.sequence_ids()
mask = [i != 1 for i in sequence_ids]
mask[0] = False # Unmask the [CLS] token
mask = torch.tensor(mask)[None]

start_logits[mask] = -10000
end_logits[mask] = -10000

start_probabilities = torch.nn.functional.softmax(start_logits, dim=-1)[0]
end_probabilities = torch.nn.functional.softmax(end_logits, dim=-1)[0]
接下来最简单的做法就是使用 argmax 函数取出 start_probabilities 和 end_probabilities 中最大的索引分别作为答案的起始和结束位置。但是这样做起始索引可能会大于结束索引,因此我们换一种方式,计算所有可能的答案片段的概率,然后将概率最高的片段作为答案:
具体的,我们假设“答案从 $\text{index}_{start}$ 开始”与“答案以 $\text{index}_{end}$ 结束”为相互独立的事件,因此答案片段从 $\text{index}_{start}$ 开始到 $\text{index}_{end}$ 结束的概率为:
\[P(\text{index}_{start}, \text{index}_{end}) = P_{start}(\text{index}_{start})\times P_{end}(\text{index}_{end})\]因此,我们首先通过构建矩阵计算所有的概率值,然后将 $\text{index}{start} > \text{index}{end}$ 对应的值赋为 0 来遮蔽掉这些不应该出现的情况,这可以使用 Pytorch 自带的 torch.triu() 函数来完成,它会返回一个 2 维张量的上三角部分:
scores = start_probabilities[:, None] * end_probabilities[None, :]
scores = torch.triu(scores)
最后,我们只需取出矩阵 scores 中最大的值对应的索引作为答案。由于 PyTorch 会返回展平张量中的索引,因此我们还需要将索引换算为对应的 $\text{index}_{start}$ 和 $\text{index}_{end}$ (通过整除和求模运算):
max_index = scores.argmax().item()
start_index = max_index // scores.shape[1]
end_index = max_index % scores.shape[1]

inputs_with_offsets = tokenizer(question, context, return_offsets_mapping=True)
offsets = inputs_with_offsets["offset_mapping"]

start, _ = offsets[start_index]
_, end = offsets[end_index]

result = {
    "answer": context[start:end],
    "start": start,
    "end": end,
    "score": float(scores[start_index, end_index]),
}
print(result)
{'answer': 'Jax, PyTorch, and TensorFlow', 'start': 76, 'end': 104, 'score': 0.9741137027740479}
这样我们就得到了与 pipeline 模型完全相同的输出结果!
处理长文本
问答模型可能遇到的另一个问题是:如果上下文非常长,在与问题拼接后就可能会超过模型可接受的最大长度,例如默认 QA pipeline 的最大输入长度只有 384。
最简单粗暴的办法就是直接截去超过最大长度的 token,由于我们只希望对上下文进行剪裁,因此可以使用 only_second 截断策略:
inputs = tokenizer(question, long_context, max_length=384, truncation="only_second")
但是万一答案恰好在被截去的部分中,模型就无法预测出最优的结果了。
幸运的是,自动问答 pipeline 采取了一种将超过最大长度的上下文切分为文本块 (chunk) 的方式,即使答案出现在长文末尾也依然能够成功地抽取出来:
from transformers import pipeline

question_answerer = pipeline("question-answering")

long_context = """
Transformers: State of the Art NLP

Transformers provides thousands of pretrained models to perform tasks on texts such as classification, information extraction, question answering, summarization, translation, text generation and more in over 100 languages. Its aim is to make cutting-edge NLP easier to use for everyone.

Transformers provides APIs to quickly download and use those pretrained models on a given text, fine-tune them on your own datasets and then share them with the community on our model hub. At the same time, each python module defining an architecture is fully standalone and can be modified to enable quick research experiments.

Why should I use transformers?

1. Easy-to-use state-of-the-art models:
  - High performance on NLU and NLG tasks.
  - Low barrier to entry for educators and practitioners.
  - Few user-facing abstractions with just three classes to learn.
  - A unified API for using all our pretrained models.
  - Lower compute costs, smaller carbon footprint:

2. Researchers can share trained models instead of always retraining.
  - Practitioners can reduce compute time and production costs.
  - Dozens of architectures with over 10,000 pretrained models, some in more than 100 languages.

3. Choose the right framework for every part of a model's lifetime:
  - Train state-of-the-art models in 3 lines of code.
  - Move a single model between TF2.0/PyTorch frameworks at will.
  - Seamlessly pick the right framework for training, evaluation and production.

4. Easily customize a model or an example to your needs:
  - We provide examples for each architecture to reproduce the results published by its original authors.
  - Model internals are exposed as consistently as possible.
  - Model files can be used independently of the library for quick experiments.

Transformers is backed by the three most popular deep learning libraries — Jax, PyTorch and TensorFlow — with a seamless integration between them. It's straightforward to train your models with one before loading them for inference with the other.
"""
question = "Which deep learning libraries back Transformers?"
results = question_answerer(question=question, context=long_context)
print(results)
{'score': 0.9697490930557251, 'start': 1884, 'end': 1911, 'answer': 'Jax, PyTorch and TensorFlow'}
实际上,无论快速或慢速分词器都提供了按 chunk 切分文本的功能,只需要在截断文本时再添加额外的参数 return_overflowing_tokens=True。考虑到如果截断的位置不合理,也可能无法抽取出正确的答案,因此还可以通过设置步长参数 stride 控制文本块重叠部分的长度。例如:
sentence = "This sentence is not too long but we are going to split it anyway."
inputs = tokenizer(
    sentence, truncation=True, return_overflowing_tokens=True, max_length=6, stride=2
)

for ids in inputs["input_ids"]:
    print(tokenizer.decode(ids))
[CLS] This sentence is not [SEP]
[CLS] is not too long [SEP]
[CLS] too long but we [SEP]
[CLS] but we are going [SEP]
[CLS] are going to split [SEP]
[CLS] to split it anyway [SEP]
[CLS] it anyway. [SEP]
可以看到在 max_length=6, stride=2 设置下,切分出的文本块最多只能包含 6 个 token,并且文本块之间有 2 个 token 重叠。如果我们进一步打印编码结果就会发现,除了常规的 token ID 和注意力 Mask 以外,还有一个 overflow_to_sample_mapping 项,它负责记录每一个文本块对应原文中的句子索引,例如:
sentence = "This sentence is not too long but we are going to split it anyway."
inputs = tokenizer(
    sentence, truncation=True, return_overflowing_tokens=True, max_length=6, stride=2
)
print(inputs.keys())
print(inputs["overflow_to_sample_mapping"])

sentences = [
    "This sentence is not too long but we are going to split it anyway.",
    "This sentence is shorter but will still get split.",
]
inputs = tokenizer(
    sentences, truncation=True, return_overflowing_tokens=True, max_length=6, stride=2
)
print(inputs["overflow_to_sample_mapping"])
dict_keys(['input_ids', 'attention_mask', 'overflow_to_sample_mapping'])
[0, 0, 0, 0, 0, 0, 0]
[0, 0, 0, 0, 0, 0, 0, 1, 1, 1, 1]
对单个句子进行切分时,因为所有的 chunk 都来源于同一个句子,因此 mapping 中对应的句子索引都为 0;而如果同时对多个句子进行切分时,可以看到其中第一个句子对应的句子索引为 0,第二个句子为 1。
QA pipeline 默认会按照预训练时的设置将最大输入长度设为 384,将步长设为 128,我们也可以在调用 pipeline 时通过参数 max_seq_len 和 stride 进行调整。
下面我们采用相同的设置对前面示例中的长文本进行分词,考虑到编码结果中除了模型需要的 token IDs 和注意力 Mask 以外,还会包含文本到 token 的映射以及 overflow_to_sample_mapping 项,这里我们只有一个句子,因此就不保留这个 map 了:
inputs = tokenizer(
    question,
    long_context,
    stride=128,
    max_length=384,
    padding="longest",
    truncation="only_second",
    return_overflowing_tokens=True,
    return_offsets_mapping=True,
)

_ = inputs.pop("overflow_to_sample_mapping")
offsets = inputs.pop("offset_mapping")

inputs = inputs.convert_to_tensors("pt")
print(inputs["input_ids"].shape)
torch.Size([2, 384])
可以看到,长文本被切分成了 2 个文本块,因此模型对应的输出也会是 2 组起始和结束 logits 值的集合:
outputs = model(**inputs)

start_logits = outputs.start_logits
end_logits = outputs.end_logits
print(start_logits.shape, end_logits.shape)
torch.Size([2, 384]) torch.Size([2, 384])
继续按照之前做的那样,在运用 softmax 转换为概率之前,我们先将非上下文的部分以及填充的 padding token 都通过 Mask 遮掩掉:
sequence_ids = inputs.sequence_ids()
# Mask everything apart from the tokens of the context
mask = [i != 1 for i in sequence_ids]
# Unmask the [CLS] token
mask[0] = False
# Mask all the [PAD] tokens
mask = torch.logical_or(torch.tensor(mask)[None], (inputs["attention_mask"] == 0))

start_logits[mask] = -10000
end_logits[mask] = -10000

start_probabilities = torch.nn.functional.softmax(start_logits, dim=-1)
end_probabilities = torch.nn.functional.softmax(end_logits, dim=-1)
注意:上面的代码中,
logical_or函数首先通过广播机制将 mask 向量从 $(1, 384)$ 扩展成了 $(2, 384)$,然后再与attention_mask张量进行计算。这是因为两个 chunk 中非上下文的部分的一致的,如果不一致就必须针对每一个文本块单独构建 mask。
同样地,对于每一个 chunk,我们对 chunk 中所有可能的文本片段都计算其为答案的概率,再从中取出概率最大的文本片段,最后将 token 索引映射回原文本作为输出:
candidates = []
for start_probs, end_probs in zip(start_probabilities, end_probabilities):
    scores = start_probs[:, None] * end_probs[None, :]
    idx = torch.triu(scores).argmax().item()

    start_idx = idx // scores.shape[0]
    end_idx = idx % scores.shape[0]
    score = scores[start_idx, end_idx].item()
    candidates.append((start_idx, end_idx, score))

for candidate, offset in zip(candidates, offsets):
    start_token, end_token, score = candidate
    start_char, _ = offset[start_token]
    _, end_char = offset[end_token]
    answer = long_context[start_char:end_char]
    result = {"answer": answer, "start": start_char, "end": end_char, "score": score}
    print(result)
{'answer': '', 'start': 0, 'end': 0, 'score': 0.6493748426437378}
{'answer': 'Jax, PyTorch and TensorFlow', 'start': 1884, 'end': 1911, 'score': 0.9697459936141968}
可以看到最终的输出与前面 pipeline 模型的输出是一致的,这也验证了我们对模型输出的处理是正确的。