本系列教程已整理至 Github,在线阅读地址:transformers.run
本文我们将运用 Transformers 库来完成翻译任务。翻译是典型的序列到序列 (sequence-to-sequence, Seq2Seq) 任务,即对于每一个输入序列都会输出一个对应的序列。翻译在任务形式上与许多其他任务很接近,例如:
-
文本摘要 (Summarization):将长文本压缩为短文本,并且还要尽可能保留核心内容。
- 风格转换 (Style transfer):将文本转换为另一种书写风格,例如将文言文转换为白话文、将古典英语转换为现代英语;
- 生成式问答 (Generative question answering):对于给定的问题,基于上下文生成对应的答案。
理论上我们也可以将本文的操作应用于完成这些 Seq2Seq 任务。
翻译任务通常需要大量的对照语料用于训练,如果我们有足够多的训练数据就可以从头训练一个翻译模型,但是微调预训练好的模型会更快,例如将 mT5、mBART 等多语言模型微调到特定的语言对。
本文我们将微调一个 Marian 翻译模型进行汉英翻译,该模型已经基于 Opus 语料对汉英翻译任务进行了预训练,因此可以直接用于翻译。而通过我们的微调,可以进一步提升该模型在特定语料上的性能。
1. 准备数据
我们选择 translation2019zh 语料作为数据集,它共包含中英文平行语料 520 万对,可以用于训练中英翻译模型。Github 仓库中只提供了 Google Drive 链接,我们也可以通过和鲸社区或者百度云盘下载。
本文我们将基于该语料,微调一个预训练好的汉英翻译模型。
该语料已经划分好了训练集和验证集,分别包含 516 万和 3.9 万个样本,语料以 json 格式提供,一行是一个中英文对照句子对:
{"english": "In Italy, there is no real public pressure for a new, fairer tax system.", "chinese": "在意大利,公众不会真的向政府施压,要求实行新的、更公平的税收制度。"}
构建数据集
与之前一样,我们首先编写继承自 Dataset 类的自定义数据集类用于组织样本和标签。考虑到 translation2019zh 并没有提供测试集,而且使用五百多万条样本进行训练耗时过长,这里我们只抽取训练集中的前 22 万条数据,并从中划分出 2 万条数据作为验证集,然后将 translation2019zh 中的验证集作为测试集:
from torch.utils.data import Dataset, random_split
import json

max_dataset_size = 220000
train_set_size = 200000
valid_set_size = 20000

class TRANS(Dataset):
    def __init__(self, data_file):
        self.data = self.load_data(data_file)

    def load_data(self, data_file):
        Data = {}
        with open(data_file, 'rt', encoding='utf-8') as f:
            for idx, line in enumerate(f):
                if idx >= max_dataset_size:
                    break
                sample = json.loads(line.strip())
                Data[idx] = sample
        return Data

    def __len__(self):
        return len(self.data)

    def __getitem__(self, idx):
        return self.data[idx]

data = TRANS('data/translation2019zh/translation2019zh_train.json')
train_data, valid_data = random_split(data, [train_set_size, valid_set_size])
test_data = TRANS('data/translation2019zh/translation2019zh_valid.json')
下面我们输出数据集的大小并且打印出一个训练样本:
print(f'train set size: {len(train_data)}')
print(f'valid set size: {len(valid_data)}')
print(f'test set size: {len(test_data)}')
print(next(iter(train_data)))
train set size: 200000
valid set size: 20000
test set size: 39323
{'english': "We're going to order some chicks for the kids and to replan the shop stock, and we chose to go with the colored ones that look cute.", 'chinese': '我们打算为儿童们定购一些小鸡,来补充商店存货,我们选择了这些被染了色的小鸡,它们看起来真的很可爱。'}
数据预处理
接下来我们就需要通过 DataLoader 库来按 batch 加载数据,将文本转换为模型可以接受的 token IDs。对于翻译任务,我们需要运用分词器同时对源文本和目标文本进行编码,这里我们选择 Helsinki-NLP 提供的汉英翻译模型 opus-mt-zh-en 对应的分词器:
from transformers import AutoTokenizer

model_checkpoint = "Helsinki-NLP/opus-mt-zh-en"
tokenizer = AutoTokenizer.from_pretrained(model_checkpoint)
你也可以尝试别的语言,Helsinki-NLP 提供了超过了一千种模型用于在不同语言之间进行翻译,只需要将 model_checkpoint 设置为对应的语言即可。如果你想使用多语言模型的分词器,例如 mBART、mBART-50、M2M100,就需要通过设置 tokenizer.src_lang 和 tokenizer.tgt_lang 来手工设定源/目标语言。
默认情况下分词器会采用源语言的设定来编码文本,要编码目标语言则需要通过上下文管理器 as_target_tokenizer():
zh_sentence = train_data[0]["chinese"]
en_sentence = train_data[0]["english"]

inputs = tokenizer(zh_sentence)
with tokenizer.as_target_tokenizer():
    targets = tokenizer(en_sentence)
如果你忘记添加上下文管理器,就会使用源语言分词器对目标语言进行编码,产生糟糕的分词结果:
wrong_targets = tokenizer(en_sentence)
print(tokenizer.convert_ids_to_tokens(inputs["input_ids"]))
print(tokenizer.convert_ids_to_tokens(targets["input_ids"]))
print(tokenizer.convert_ids_to_tokens(wrong_targets["input_ids"]))
['▁我们', '打算', '为儿童', '们', '定', '购', '一些', '小', '鸡', ',', '来', '补充', '商店', '存货', ',', '我们', '选择', '了', '这些', '被', '染', '了', '色', '的小', '鸡', ',', '它们', '看起来', '真的很', '可爱', '。', '</s>']

['▁We', "'", 're', '▁going', '▁to', '▁order', '▁some', '▁chicks', '▁for', '▁the', '▁kids', '▁and', '▁to', '▁re', 'plan', '▁the', '▁shop', '▁stock', ',', '▁and', '▁we', '▁chose', '▁to', '▁go', '▁with', '▁the', '▁color', 'ed', '▁ones', '▁that', '▁look', '▁cute', '.', '</s>']

['▁We', "'", 're', '▁going', '▁to', '▁', 'or', 'der', '▁some', '▁ch', 'ick', 's', '▁for', '▁the', '▁k', 'id', 's', '▁and', '▁to', '▁re', 'p', 'lan', '▁the', '▁', 'sh', 'op', '▁', 'st', 'ock', ',', '▁and', '▁we', '▁', 'cho', 'se', '▁to', '▁go', '▁with', '▁the', '▁c', 'olo', 'red', '▁', 'ones', '▁that', '▁look', '▁', 'cu', 'te', '.', '</s>']
可以看到,由于中文分词器无法识别大部分的英文单词,用它编码英文会生成更多的 token,例如这里将“order”切分为了“or”和“der”,将“chicks”切分为了“ch”、“ick”、“s”等等。
对于翻译任务,标签序列就是目标语言的 token ID 序列。与序列标注任务类似,我们会在模型预测出的标签序列与答案标签序列之间计算损失来调整模型参数,因此我们同样需要将填充的 pad 字符设置为 -100,以便在使用交叉熵计算序列损失时将它们忽略:
import torch

max_input_length = 128
max_target_length = 128

inputs = [train_data[s_idx]["chinese"] for s_idx in range(4)]
targets = [train_data[s_idx]["english"] for s_idx in range(4)]

model_inputs = tokenizer(
    inputs,
    padding=True,
    max_length=max_input_length,
    truncation=True,
    return_tensors="pt"
)
with tokenizer.as_target_tokenizer():
    labels = tokenizer(
        targets,
        padding=True,
        max_length=max_target_length,
        truncation=True,
        return_tensors="pt"
    )["input_ids"]

end_token_index = torch.where(labels == tokenizer.eos_token_id)[1]
for idx, end_idx in enumerate(end_token_index):
    labels[idx][end_idx+1:] = -100

print('batch_X shape:', {k: v.shape for k, v in model_inputs.items()})
print('batch_y shape:', labels.shape)
print(model_inputs)
print(labels)
batch_X shape: {
    'input_ids': torch.Size([4, 36]),
    'attention_mask': torch.Size([4, 36])
}
batch_y shape: torch.Size([4, 43])

{'input_ids': tensor([
        [  335,  3321, 20836,  2505,  3410, 13425,   617,  1049, 12245,     2,
           272,  2369, 25067, 28865,     2,   230,  1507,    55,   288,   266,
         19981,    55,  5144,  9554, 12245,     2,   896, 13699, 15710, 15249,
             9,     0, 65000, 65000, 65000, 65000],
        [ 5786, 23552,    36,  8380, 16532,   378,   675,  2878,   272,   702,
         22092,    11, 20819,  4085,   309,  3428, 43488,     9,     0, 65000,
         65000, 65000, 65000, 65000, 65000, 65000, 65000, 65000, 65000, 65000,
         65000, 65000, 65000, 65000, 65000, 65000],
        [  103, 27772, 32598,   241,   930,     2,  8714,  4349,  9460,    69,
         10866,   272,  2733,  1499, 18852,  8390,    11,    25,   384,  5520,
         35761,  1924,  1251,  1499,     9,     0, 65000, 65000, 65000, 65000,
         65000, 65000, 65000, 65000, 65000, 65000],
        [    7,   706,  5634, 24065, 16505, 13502,   176, 10252, 53105,     2,
          3021,  5980, 31854,  2509,     9,    91,   646,  3976, 40408,  6305,
            11,  7440,  1020,  7471, 56880,  5980, 31854,    34, 46037, 17267,
           514, 43792,  6455, 20889,    17,     0]]),
 'attention_mask': tensor([
        [1, 1, 1, 1, 1, 1, 1, 1, 1, 1, 1, 1, 1, 1, 1, 1, 1, 1, 1, 1, 1, 1, 1, 1,
         1, 1, 1, 1, 1, 1, 1, 1, 0, 0, 0, 0],
        [1, 1, 1, 1, 1, 1, 1, 1, 1, 1, 1, 1, 1, 1, 1, 1, 1, 1, 1, 0, 0, 0, 0, 0,
         0, 0, 0, 0, 0, 0, 0, 0, 0, 0, 0, 0],
        [1, 1, 1, 1, 1, 1, 1, 1, 1, 1, 1, 1, 1, 1, 1, 1, 1, 1, 1, 1, 1, 1, 1, 1,
         1, 1, 0, 0, 0, 0, 0, 0, 0, 0, 0, 0],
        [1, 1, 1, 1, 1, 1, 1, 1, 1, 1, 1, 1, 1, 1, 1, 1, 1, 1, 1, 1, 1, 1, 1, 1,
         1, 1, 1, 1, 1, 1, 1, 1, 1, 1, 1, 1]])}

tensor([[  140,    21,   129,   717,     8,   278,   239, 53363,    14,     3,
          6801,     6,     8,  1296, 38776,     3, 18850,  7985,     2,     6,
           107, 21883,     8,   374,    27,     3, 20969,   250,  6048,    19,
          1217, 20511,     5,     0,  -100,  -100,  -100,  -100,  -100,  -100,
          -100,  -100,  -100],
        [ 3822, 28838,   847,   115,    12, 17059,     8,   603,   649,     4,
         33030,    46,     3,   315,   557,     3, 21347,     5,     0,  -100,
          -100,  -100,  -100,  -100,  -100,  -100,  -100,  -100,  -100,  -100,
          -100,  -100,  -100,  -100,  -100,  -100,  -100,  -100,  -100,  -100,
          -100,  -100,  -100],
        [  379, 41237,   480,    26,  2127,    10,   158,  1963,    19,     3,
         24463,  2564,    18,  1509,     8, 41272,   158, 28930,    25,    58,
            43, 32192, 10532,    42,   172,   105,     5,     0,  -100,  -100,
          -100,  -100,  -100,  -100,  -100,  -100,  -100,  -100,  -100,  -100,
          -100,  -100,  -100],
        [48532,     3, 42162,    22,    29,    95,  1568, 15398,     7, 41830,
            59, 14375,  2104,   168,  5101,  6347,  3708,  7497, 36852,     6,
         29594,   199,    27,    12,  1960, 32215, 18162, 27015,     4,  8706,
          1029,    20,  4098,    54,  8273,     8,  8996,     3, 41372,   102,
         50348,   243,     0]])
我们使用的 Marian 模型会在分词结果的结尾加上特殊 token '</s>',因此这里通过 tokenizer.eos_token_id 定位其在 token ID 序列中的索引,然后将其之后的 pad 字符设置为 -100。
标签序列的格式需要依据模型而定,例如如果你使用的是 T5 模型,模型的输入还需要包含指明任务类型的前缀 (prefix),对于翻译任务就需要在输入前添加
Chinese to English:。
与我们之前任务中使用的纯 Encoder 模型不同,Seq2Seq 任务对应的模型采用的是 Encoder-Decoder 框架:Encoder 负责编码输入序列,Decoder 负责循环地逐个生成输出 token。因此,对于每一个样本,我们还需要额外准备 decoder input IDs 作为 Decoder 的输入。decoder input IDs 是标签序列的移位,在序列的开始位置增加了一个特殊的“序列起始符”。
在训练过程中,模型会基于 decoder input IDs 和 attention mask 来确保在预测某个 token 时不会使用到该 token 及其之后的 token 的信息。即 Decoder 在预测某个目标 token 时,只能基于“整个输入序列”和“当前已经预测出的 token”信息来进行预测,如果提前看到要预测的 token(甚至更后面的 token),就相当于是“作弊”了。因此在训练时,会通过特殊的“三角形” Mask 来遮掩掉预测 token 及其之后的 token 的信息。
如果对这一块感到困惑,可以参考苏剑林的博文《从语言模型到Seq2Seq:Transformer如戏,全靠Mask》。
考虑到不同模型的移位操作可能存在差异,我们通过模型自带的 prepare_decoder_input_ids_from_labels 函数来完成。完整的批处理函数为:
import torch
from torch.utils.data import DataLoader
from transformers import AutoModelForSeq2SeqLM

max_input_length = 128
max_target_length = 128

device = 'cuda' if torch.cuda.is_available() else 'cpu'
print(f'Using {device} device')

model = AutoModelForSeq2SeqLM.from_pretrained(model_checkpoint)
model = model.to(device)

def collote_fn(batch_samples):
    batch_inputs, batch_targets = [], []
    for sample in batch_samples:
        batch_inputs.append(sample['chinese'])
        batch_targets.append(sample['english'])
    batch_data = tokenizer(
        batch_inputs,
        padding=True,
        max_length=max_input_length,
        truncation=True,
        return_tensors="pt"
    )
    with tokenizer.as_target_tokenizer():
        labels = tokenizer(
            batch_targets,
            padding=True,
            max_length=max_target_length,
            truncation=True,
            return_tensors="pt"
        )["input_ids"]
        batch_data['decoder_input_ids'] = model.prepare_decoder_input_ids_from_labels(labels)
        end_token_index = torch.where(labels == tokenizer.eos_token_id)[1]
        for idx, end_idx in enumerate(end_token_index):
            labels[idx][end_idx+1:] = -100
        batch_data['labels'] = labels
    return batch_data

train_dataloader = DataLoader(train_data, batch_size=32, shuffle=True, collate_fn=collote_fn)
valid_dataloader = DataLoader(valid_data, batch_size=32, shuffle=False, collate_fn=collote_fn)
注意,由于本文直接使用 Transformers 库自带的 AutoModelForSeq2SeqLM 函数来构建模型,因此我们将每一个 batch 中的数据处理为该模型可接受的格式:一个包含 'attention_mask'、'input_ids'、'labels' 和 'decoder_input_ids' 键的字典。
下面我们尝试打印出一个 batch 的数据,以验证是否处理正确:
batch = next(iter(train_dataloader))
print(batch.keys())
print('batch shape:', {k: v.shape for k, v in batch.items()})
print(batch)
dict_keys(['input_ids', 'attention_mask', 'decoder_input_ids', 'labels'])

batch shape: {
    'input_ids': torch.Size([4, 57]),
    'attention_mask': torch.Size([4, 57]),
    'decoder_input_ids': torch.Size([4, 37]),
    'labels': torch.Size([4, 37])
}

{'input_ids': tensor([
        [ 4385,   257,  6095, 11065,  4028,   142,     2, 14025, 16036,  2059,
          2677,     9,     0, 65000, 65000, 65000, 65000, 65000, 65000, 65000,
         65000, 65000, 65000, 65000, 65000, 65000, 65000, 65000, 65000, 65000,
         65000, 65000, 65000, 65000, 65000, 65000, 65000, 65000, 65000, 65000,
         65000, 65000, 65000, 65000, 65000, 65000, 65000, 65000, 65000, 65000,
         65000, 65000, 65000, 65000, 65000, 65000, 65000],
        [  335,   675,  6072,   160,  2353, 12746,  6875, 10851,    13,  3067,
         49431,    13, 21639, 11180,   188, 23811,  3127, 59374, 12746,    16,
         10801, 10459,     2,  2754,   101, 62987,  3975,  6875, 10851,  2326,
            13, 16106, 39781,  6875, 10851,  2326,    13, 41743,  3975,  6875,
         10851,  2326,    13,  3067, 49431,  2326,    13,  4011, 21639,  2326,
            13, 23811,  3127, 59374,   408,     9,     0],
        [    7, 10900,  2702,  2997,  5257,  4145,  3277,  9239,  2437,     2,
          1222, 11929,     2,    36,  4776,  4998,  2992,  2061,    16,  5029,
          2061, 27060,  1297,     2, 10900,  2702, 28874,  5029,  4205,    16,
         11959,  4205, 29858,     9,     0, 65000, 65000, 65000, 65000, 65000,
         65000, 65000, 65000, 65000, 65000, 65000, 65000, 65000, 65000, 65000,
         65000, 65000, 65000, 65000, 65000, 65000, 65000],
        [    7,   690,   840,    31,    11,  2847,     2, 61232,  1862,  2989,
          4870,  1548, 55902,  1058,   348,  4316,  1371, 14036,     9,     0,
         65000, 65000, 65000, 65000, 65000, 65000, 65000, 65000, 65000, 65000,
         65000, 65000, 65000, 65000, 65000, 65000, 65000, 65000, 65000, 65000,
         65000, 65000, 65000, 65000, 65000, 65000, 65000, 65000, 65000, 65000,
         65000, 65000, 65000, 65000, 65000, 65000, 65000]]),
 'attention_mask': tensor([
        [1, 1, 1, 1, 1, 1, 1, 1, 1, 1, 1, 1, 1, 0, 0, 0, 0, 0, 0, 0, 0, 0, 0, 0,
         0, 0, 0, 0, 0, 0, 0, 0, 0, 0, 0, 0, 0, 0, 0, 0, 0, 0, 0, 0, 0, 0, 0, 0,
         0, 0, 0, 0, 0, 0, 0, 0, 0],
        [1, 1, 1, 1, 1, 1, 1, 1, 1, 1, 1, 1, 1, 1, 1, 1, 1, 1, 1, 1, 1, 1, 1, 1,
         1, 1, 1, 1, 1, 1, 1, 1, 1, 1, 1, 1, 1, 1, 1, 1, 1, 1, 1, 1, 1, 1, 1, 1,
         1, 1, 1, 1, 1, 1, 1, 1, 1],
        [1, 1, 1, 1, 1, 1, 1, 1, 1, 1, 1, 1, 1, 1, 1, 1, 1, 1, 1, 1, 1, 1, 1, 1,
         1, 1, 1, 1, 1, 1, 1, 1, 1, 1, 1, 0, 0, 0, 0, 0, 0, 0, 0, 0, 0, 0, 0, 0,
         0, 0, 0, 0, 0, 0, 0, 0, 0],
        [1, 1, 1, 1, 1, 1, 1, 1, 1, 1, 1, 1, 1, 1, 1, 1, 1, 1, 1, 1, 0, 0, 0, 0,
         0, 0, 0, 0, 0, 0, 0, 0, 0, 0, 0, 0, 0, 0, 0, 0, 0, 0, 0, 0, 0, 0, 0, 0,
         0, 0, 0, 0, 0, 0, 0, 0, 0]]),
 'decoder_input_ids': tensor([
        [65000,  1738,   209,    30,  1294,    30,    54, 43574,    22,     2,
           183,     3,  1483,     4,  1540,  7418,     5,     0, 65000, 65000,
         65000, 65000, 65000, 65000, 65000, 65000, 65000, 65000, 65000, 65000,
         65000, 65000, 65000, 65000, 65000, 65000, 65000],
        [65000,   140,   281,   520,  2293,     4, 37984,   102,     7,     2,
         26398,  1632,     2, 32215,   102,     2, 22188,  1403,     6,  3825,
             7,     2,   286,  1282,  2687,   586, 55450, 37984,   501,     2,
          7684,   177, 37984,   501,     2,   825,  1181],
        [65000, 50295, 53923, 54326,    22,  4471,     2,   513, 26103,     4,
          3275,  2707,  2907,     6,    10,    12,  4405,   625,    10, 10813,
             4, 50295, 53923,  1906, 15486, 10813,  5032,     6, 13962,  5032,
         12620,     5,     0, 65000, 65000, 65000, 65000],
        [65000,  1008,   840,    28, 41223,  4688,    30, 37855,   250, 10204,
             4,  2407,     5,     0, 65000, 65000, 65000, 65000, 65000, 65000,
         65000, 65000, 65000, 65000, 65000, 65000, 65000, 65000, 65000, 65000,
         65000, 65000, 65000, 65000, 65000, 65000, 65000]]),
 'labels': tensor([
        [ 1738,   209,    30,  1294,    30,    54, 43574,    22,     2,   183,
             3,  1483,     4,  1540,  7418,     5,     0,  -100,  -100,  -100,
          -100,  -100,  -100,  -100,  -100,  -100,  -100,  -100,  -100,  -100,
          -100,  -100,  -100,  -100,  -100,  -100,  -100],
        [  140,   281,   520,  2293,     4, 37984,   102,     7,     2, 26398,
          1632,     2, 32215,   102,     2, 22188,  1403,     6,  3825,     7,
             2,   286,  1282,  2687,   586, 55450, 37984,   501,     2,  7684,
           177, 37984,   501,     2,   825,  1181,     0],
        [50295, 53923, 54326,    22,  4471,     2,   513, 26103,     4,  3275,
          2707,  2907,     6,    10,    12,  4405,   625,    10, 10813,     4,
         50295, 53923,  1906, 15486, 10813,  5032,     6, 13962,  5032, 12620,
             5,     0,  -100,  -100,  -100,  -100,  -100],
        [ 1008,   840,    28, 41223,  4688,    30, 37855,   250, 10204,     4,
          2407,     5,     0,  -100,  -100,  -100,  -100,  -100,  -100,  -100,
          -100,  -100,  -100,  -100,  -100,  -100,  -100,  -100,  -100,  -100,
          -100,  -100,  -100,  -100,  -100,  -100,  -100]])}
可以看到,DataLoader 按照我们设置的 batch size,每次对 4 个样本进行编码,并且填充 token 对应的标签都被设置为 -100。我们构建的 Decoder 的输入 decoder input IDs 尺寸与标签序列完全相同,且通过向后移位在序列头部添加了特殊的“序列起始符”,例如第一个样本:
'labels':
        [ 1738,   209,    30,  1294,    30,    54, 43574,    22,     2,   183,
             3,  1483,     4,  1540,  7418,     5,     0,  -100,  -100,  -100,
          -100,  -100,  -100,  -100,  -100,  -100,  -100,  -100,  -100,  -100,
          -100,  -100,  -100,  -100,  -100,  -100,  -100]
'decoder_input_ids':
        [65000,  1738,   209,    30,  1294,    30,    54, 43574,    22,     2,
           183,     3,  1483,     4,  1540,  7418,     5,     0, 65000, 65000,
         65000, 65000, 65000, 65000, 65000, 65000, 65000, 65000, 65000, 65000,
         65000, 65000, 65000, 65000, 65000, 65000, 65000]
至此,数据预处理部分就全部完成了!
在大部分情况下,即使我们在 batch 数据中没有包含 decoder input IDs,模型也能正常训练,它会自动调用模型的
prepare_decoder_input_ids_from_labels函数来构造decoder_input_ids。
2. 训练模型
本文直接使用 Transformers 库自带的 AutoModelForSeq2SeqLM 类来构建模型,并且在批处理函数中还调用了模型自带的 prepare_decoder_input_ids_from_labels 函数,因此下面只需要实现 Epoch 中的”训练循环”和”验证/测试循环”。
这里之所以没有像前面章节中那样自己编写模型,是因为翻译模型的结构较为复杂,要完整地完成编码、解码过程需要借助许多辅助函数。我们可以想象,如果我们同样通过继承
PreTrainedModel类来实现翻译模型,那么其结构大致为:from torch import nn from transformers import AutoConfig from transformers.models.marian import MarianPreTrainedModel, MarianModel class MarianForMT(MarianPreTrainedModel): def __init__(self, config): super().__init__(config) self.model = MarianModel(config) target_vocab_size = config.decoder_vocab_size self.register_buffer("final_logits_bias", torch.zeros((1, target_vocab_size))) self.lm_head = nn.Linear(config.d_model, target_vocab_size, bias=False) self.post_init() def forward(self, x): output = self.model(**x) sequence_output = output.last_hidden_state lm_logits = self.lm_head(sequence_output) + self.final_logits_bias return lm_logits def other_func(self): pass config = AutoConfig.from_pretrained(checkpoint) model = MarianForMT.from_pretrained(checkpoint, config=config).to(device) print(model)Using cpu device MarianForMT( (model): MarianModel( (shared): Embedding(65001, 512, padding_idx=65000) (encoder): MarianEncoder(...) (decoder): MarianDecoder(...) ) (lm_head): Linear(in_features=512, out_features=65001, bias=False) )即模型会首先运用 Marian 模型的 Encoder 对输入 token 序列进行编码,然后通过 Decoder 基于我们构建的 Decoder 输入解码出对应的目标向量序列,最后将输出序列送入到一个包含 65001 个神经元的线性全连接层中进行分类,预测每个向量对应的是词表中的哪个词。
为了测试模型的操作是否符合预期,我们尝试将一个 batch 的数据送入模型:
outputs = model(batch_X)
print(outputs.shape)
torch.Size([4, 37, 65001])可以看到,模型的输出尺寸 $4\times 37\times 65001$ 与我们构造的 Decoder 输入
decoder_input_ids尺寸完全一致。
优化模型参数
使用 AutoModelForSeq2SeqLM 构造的模型已经封装好了对应的损失函数,并且计算出的损失会直接包含在模型的输出 outputs 中,可以直接通过 outputs.loss 获得,因此训练循环为:
from tqdm.auto import tqdm

def train_loop(dataloader, model, optimizer, lr_scheduler, epoch, total_loss):
    progress_bar = tqdm(range(len(dataloader)))
    progress_bar.set_description(f'loss: {0:>7f}')
    finish_batch_num = (epoch-1) * len(dataloader)

    model.train()
    for batch, batch_data in enumerate(dataloader, start=1):
        batch_data = batch_data.to(device)
        outputs = model(**batch_data)
        loss = outputs.loss

        optimizer.zero_grad()
        loss.backward()
        optimizer.step()
        lr_scheduler.step()

        total_loss += loss.item()
        progress_bar.set_description(f'loss: {total_loss/(finish_batch_num + batch):>7f}')
        progress_bar.update(1)
    return total_loss
与序列标注任务类似,翻译任务的输出同样是一个预测向量序列,因此在使用交叉熵计算模型损失时,要么对维度进行调整,要么通过
view()将 batch 中的多个向量序列连接为一个序列。因为我们已经将填充 token 对应的标签设为了 -100,所以模型实际上是借助view()调整输出张量的尺寸来计算损失的:loss_fct = CrossEntropyLoss() loss = loss_fct(lm_logits.view(-1, self.config.decoder_vocab_size), labels.view(-1))
验证/测试循环负责评估模型的性能。对于翻译任务,经典的评估指标是 Kishore Papineni 等人在《BLEU: a Method for Automatic Evaluation of Machine Translation》中提出的 BLEU 值,用于度量两个词语序列之间的一致性,但是其并不会衡量语义连贯性或者语法正确性。
由于计算 BLEU 值需要输入分好词的文本,而不同的分词方式会对结果造成影响,因此现在更常用的评估指标是 SacreBLEU,它对分词的过程进行了标准化。SacreBLEU 直接以未分词的文本作为输入,并且对于同一个输入可以接受多个目标作为参考。虽然我们使用的 translation2019zh 语料对于每一个句子只有一个参考,也需要将其包装为一个句子列表,例如:
from sacrebleu.metrics import BLEU

predictions = [
    "This plugin lets you translate web pages between several languages automatically."
]
bad_predictions_1 = ["This This This This"]
bad_predictions_2 = ["This plugin"]
references = [
    [
        "This plugin allows you to automatically translate web pages between several languages."
    ]
]

bleu = BLEU()
print(bleu.corpus_score(predictions, references).score)
print(bleu.corpus_score(bad_predictions_1, references).score)
print(bleu.corpus_score(bad_predictions_2, references).score)
46.750469682990165
1.683602693167689
0.0
BLEU 值的范围从 0 到 100,越高越高。可以看到,对于一些槽糕的翻译结果,例如包含大量重复词语或者长度过短的预测结果,会计算出非常低的 BLEU 值。
SacreBLEU 默认会采用 mteval-v13a.pl 分词器对文本进行分词,但是它无法处理中文、日文等非拉丁系语言。对于中文就需要设置参数 tokenize='zh' 手动使用中文分词器,否则会计算出不正确的 BLEU 值:
from sacrebleu.metrics import BLEU

predictions = [
    "我在苏州大学学习计算机,苏州大学很美丽。"
]

references = [
    [
        "我在环境优美的苏州大学学习计算机。"
    ]
]

bleu = BLEU(tokenize='zh')
print(f'BLEU: {bleu.corpus_score(predictions, references).score}')
bleu = BLEU()
print(f'wrong BLEU: {bleu.corpus_score(predictions, references).score}')
BLEU: 45.340106118883256
wrong BLEU: 0.0
使用 AutoModelForSeq2SeqLM 构造的模型同样对 Decoder 的解码过程进行了封装,我们只需要调用模型的 generate() 函数就可以自动地逐个生成预测 token。例如,我们可以直接调用预训练好的 Marian 模型进行翻译:
import torch
from transformers import AutoTokenizer
from transformers import AutoModelForSeq2SeqLM

device = 'cuda' if torch.cuda.is_available() else 'cpu'
print(f'Using {device} device')

model_checkpoint = "Helsinki-NLP/opus-mt-zh-en"
tokenizer = AutoTokenizer.from_pretrained(model_checkpoint)
model = AutoModelForSeq2SeqLM.from_pretrained(model_checkpoint)
model = model.to(device)

sentence = '我叫张三,我住在苏州。'

sentence_inputs = tokenizer(sentence, return_tensors="pt").to(device)
sentence_generated_tokens = model.generate(
    sentence_inputs["input_ids"],
    attention_mask=sentence_inputs["attention_mask"],
    max_length=128
)
sentence_decoded_pred = tokenizer.decode(sentence_generated_tokens[0], skip_special_tokens=True)
print(sentence_decoded_pred)
Using cpu device
My name is Zhang San, and I live in Suzhou.
在 generate() 生成 token ID 之后,我们通过分词器自带的 tokenizer.batch_decode() 函数将 batch 中所有的 token ID 序列都转换为文本,因此翻译多个句子也没有问题:
sentences = ['我叫张三,我住在苏州。', '我在环境优美的苏州大学学习计算机。']

sentences_inputs = tokenizer(
    sentences,
    padding=True,
    max_length=128,
    truncation=True,
    return_tensors="pt"
).to(device)
sentences_generated_tokens = model.generate(
    sentences_inputs["input_ids"],
    attention_mask=sentences_inputs["attention_mask"],
    max_length=128
)
sentences_decoded_preds = tokenizer.batch_decode(sentences_generated_tokens, skip_special_tokens=True)
print(sentences_decoded_preds)
[
    'My name is Zhang San, and I live in Suzhou.',
    "I'm studying computers at Suzhou University in a beautiful environment."
]
在“验证/测试循环”中,我们首先通过 model.generate() 函数获取预测结果,然后将预测结果和正确标签都处理为 SacreBLEU 接受的文本列表形式(这里我们将标签序列中的 -100 替换为 pad token ID 以便于分词器解码),最后送入到 SacreBLEU 中计算 BLEU 值:
from sacrebleu.metrics import BLEU
bleu = BLEU()

def test_loop(dataloader, model):
    preds, labels = [], []

    model.eval()
    for batch_data in tqdm(dataloader):
        batch_data = batch_data.to(device)
        with torch.no_grad():
            generated_tokens = model.generate(
                batch_data["input_ids"],
                attention_mask=batch_data["attention_mask"],
                max_length=max_target_length,
            ).cpu().numpy()
        label_tokens = batch_data["labels"].cpu().numpy()

        decoded_preds = tokenizer.batch_decode(generated_tokens, skip_special_tokens=True)
        label_tokens = np.where(label_tokens != -100, label_tokens, tokenizer.pad_token_id)
        decoded_labels = tokenizer.batch_decode(label_tokens, skip_special_tokens=True)

        preds += [pred.strip() for pred in decoded_preds]
        labels += [[label.strip()] for label in decoded_labels]
    bleu_score = bleu.corpus_score(preds, labels).score
    print(f"BLEU: {bleu_score:>0.2f}\n")
    return bleu_score
为了方便后续保存验证集上最好的模型,这里我们还在验证/测试循环中返回模型计算出的 BLEU 值。
保存模型
与之前一样,我们会根据模型在验证集上的性能来调整超参数以及选出最好的模型权重,然后将选出的模型应用于测试集以评估最终的性能。这里我们继续使用 AdamW 优化器,并且通过 get_scheduler() 函数定义学习率调度器:
from transformers import AdamW, get_scheduler

learning_rate = 2e-5
epoch_num = 3

optimizer = AdamW(model.parameters(), lr=learning_rate)
lr_scheduler = get_scheduler(
    "linear",
    optimizer=optimizer,
    num_warmup_steps=0,
    num_training_steps=epoch_num*len(train_dataloader),
)

total_loss = 0.
best_bleu = 0.
for t in range(epoch_num):
    print(f"Epoch {t+1}/{epoch_num}\n-------------------------------")
    total_loss = train_loop(train_dataloader, model, optimizer, lr_scheduler, t+1, total_loss)
    valid_bleu = test_loop(valid_dataloader, model, mode='Valid')
    if valid_bleu > best_bleu:
        best_bleu = valid_bleu
        print('saving new weights...\n')
        torch.save(model.state_dict(), f'epoch_{t+1}_valid_bleu_{valid_bleu:0.2f}_model_weights.bin')
print("Done!")
在开始训练之前,我们先评估一下没有微调的模型在测试集上的性能。这个过程比较耗时,你可以在它执行的时候喝杯咖啡:)
test_data = TRANS('data/translation2019zh/translation2019zh_valid.json')
test_dataloader = DataLoader(test_data, batch_size=32, shuffle=False, collate_fn=collote_fn)

test_loop(test_dataloader, model)
Using cuda device
100%|█████████████████████████|  615/615 [19:08<00:00,  1.87s/it]
Test BLEU: 42.61
可以看到预训练模型在测试集上的 BLEU 值为 42.61,即使不进行微调,也已经具有不错的汉英翻译能力。
下面我们正式开始训练(微调)模型,完整的训练代码如下:
import random
import os
import numpy as np
import torch
from torch.utils.data import Dataset, DataLoader, random_split
from transformers import AutoTokenizer, AutoModelForSeq2SeqLM
from transformers import AdamW, get_scheduler
from sacrebleu.metrics import BLEU
from tqdm.auto import tqdm
import json

def seed_everything(seed=1029):
    random.seed(seed)
    os.environ['PYTHONHASHSEED'] = str(seed)
    np.random.seed(seed)
    torch.manual_seed(seed)
    torch.cuda.manual_seed(seed)
    torch.cuda.manual_seed_all(seed)
    torch.backends.cudnn.deterministic = True

device = 'cuda' if torch.cuda.is_available() else 'cpu'
print(f'Using {device} device')
seed_everything(42)

max_dataset_size = 220000
train_set_size = 200000
valid_set_size = 20000

max_input_length = 128
max_target_length = 128

batch_size = 32
learning_rate = 1e-5
epoch_num = 3

class TRANS(Dataset):
    def __init__(self, data_file):
        self.data = self.load_data(data_file)

    def load_data(self, data_file):
        Data = {}
        with open(data_file, 'rt', encoding='utf-8') as f:
            for idx, line in enumerate(f):
                if idx >= max_dataset_size:
                    break
                sample = json.loads(line.strip())
                Data[idx] = sample
        return Data

    def __len__(self):
        return len(self.data)

    def __getitem__(self, idx):
        return self.data[idx]

data = TRANS('data/translation2019zh/translation2019zh_train.json')
train_data, valid_data = random_split(data, [train_set_size, valid_set_size])
test_data = TRANS('data/translation2019zh/translation2019zh_valid.json')

model_checkpoint = "Helsinki-NLP/opus-mt-zh-en"
tokenizer = AutoTokenizer.from_pretrained(model_checkpoint)
model = AutoModelForSeq2SeqLM.from_pretrained(model_checkpoint)
model = model.to(device)

def collote_fn(batch_samples):
    batch_inputs, batch_targets = [], []
    for sample in batch_samples:
        batch_inputs.append(sample['chinese'])
        batch_targets.append(sample['english'])
    batch_data = tokenizer(
        batch_inputs,
        padding=True,
        max_length=max_input_length,
        truncation=True,
        return_tensors="pt"
    )
    with tokenizer.as_target_tokenizer():
        labels = tokenizer(
            batch_targets,
            padding=True,
            max_length=max_target_length,
            truncation=True,
            return_tensors="pt"
        )["input_ids"]
        batch_data['decoder_input_ids'] = model.prepare_decoder_input_ids_from_labels(labels)
        end_token_index = torch.where(labels == tokenizer.eos_token_id)[1]
        for idx, end_idx in enumerate(end_token_index):
            labels[idx][end_idx+1:] = -100
        batch_data['labels'] = labels
    return batch_data

train_dataloader = DataLoader(train_data, batch_size=batch_size, shuffle=True, collate_fn=collote_fn)
valid_dataloader = DataLoader(valid_data, batch_size=batch_size, shuffle=False, collate_fn=collote_fn)
test_dataloader = DataLoader(test_data, batch_size=batch_size, shuffle=False, collate_fn=collote_fn)

def train_loop(dataloader, model, optimizer, lr_scheduler, epoch, total_loss):
    progress_bar = tqdm(range(len(dataloader)))
    progress_bar.set_description(f'loss: {0:>7f}')
    finish_batch_num = (epoch-1) * len(dataloader)

    model.train()
    for batch, batch_data in enumerate(dataloader, start=1):
        batch_data = batch_data.to(device)
        outputs = model(**batch_data)
        loss = outputs.loss

        optimizer.zero_grad()
        loss.backward()
        optimizer.step()
        lr_scheduler.step()

        total_loss += loss.item()
        progress_bar.set_description(f'loss: {total_loss/(finish_batch_num + batch):>7f}')
        progress_bar.update(1)
    return total_loss

bleu = BLEU()

def test_loop(dataloader, model):
    preds, labels = [], []

    model.eval()
    for batch_data in tqdm(dataloader):
        batch_data = batch_data.to(device)
        with torch.no_grad():
            generated_tokens = model.generate(
                batch_data["input_ids"],
                attention_mask=batch_data["attention_mask"],
                max_length=max_target_length,
            ).cpu().numpy()
        label_tokens = batch_data["labels"].cpu().numpy()

        decoded_preds = tokenizer.batch_decode(generated_tokens, skip_special_tokens=True)
        label_tokens = np.where(label_tokens != -100, label_tokens, tokenizer.pad_token_id)
        decoded_labels = tokenizer.batch_decode(label_tokens, skip_special_tokens=True)

        preds += [pred.strip() for pred in decoded_preds]
        labels += [[label.strip()] for label in decoded_labels]
    bleu_score = bleu.corpus_score(preds, labels).score
    print(f"BLEU: {bleu_score:>0.2f}\n")
    return bleu_score

optimizer = AdamW(model.parameters(), lr=learning_rate)
lr_scheduler = get_scheduler(
    "linear",
    optimizer=optimizer,
    num_warmup_steps=0,
    num_training_steps=epoch_num*len(train_dataloader),
)

total_loss = 0.
best_bleu = 0.
for t in range(epoch_num):
    print(f"Epoch {t+1}/{epoch_num}\n-------------------------------")
    total_loss = train_loop(train_dataloader, model, optimizer, lr_scheduler, t+1, total_loss)
    valid_bleu = test_loop(valid_dataloader, model)
    if valid_bleu > best_bleu:
        best_bleu = valid_bleu
        print('saving new weights...\n')
        torch.save(
            model.state_dict(),
            f'epoch_{t+1}_valid_bleu_{valid_bleu:0.2f}_model_weights.bin'
        )
print("Done!")
Using cuda device
Epoch 1/3
-------------------------------
loss: 2.570799: 100%|██████████| 6250/6250 [11:19<00:00,  9.20it/s]
100%|██████████| 625/625 [10:51<00:00,  1.04s/it]
BLEU: 53.38

saving new weights...

Epoch 2/3
-------------------------------
loss: 2.498721: 100%|██████████| 6250/6250 [11:21<00:00,  9.17it/s]
100%|██████████| 625/625 [11:08<00:00,  1.07s/it]
BLEU: 53.38

Epoch 3/3
-------------------------------
loss: 2.454356: 100%|██████████| 6250/6250 [11:21<00:00,  9.17it/s]
100%|██████████| 625/625 [10:51<00:00,  1.04s/it]
BLEU: 53.38

Done!
可以看到,随着训练的进行,模型在训练集上的损失一直在下降,但是在验证集上的 BLEU 值却并没有提升,在第一轮后就稳定在 53.38。因此,3 轮训练结束后,目录下只保存了第一轮训练后的模型权重:
epoch_1_valid_bleu_53.38_model_weights.bin
至此,我们对中英翻译 Marian 模型的训练(微调)过程就完成了。
3. 测试模型
训练完成后,我们加载在验证集上性能最优的模型权重,汇报其在测试集上的性能,并且将模型的预测结果保存到文件中。
由于 AutoModelForSeq2SeqLM 对整个解码过程进行了封装,我们只需要调用 generate() 函数就可以自动通过 beam search 找到最佳的 token ID 序列,因此我们只需要再使用分词器将 token ID 序列转换为文本就可以获得翻译结果:
test_data = TRANS('translation2019zh/translation2019zh_valid.json')
test_dataloader = DataLoader(test_data, batch_size=32, shuffle=False, collate_fn=collote_fn)

import json

model.load_state_dict(torch.load('epoch_1_valid_bleu_53.38_model_weights.bin'))

model.eval()
with torch.no_grad():
    print('evaluating on test set...')
    sources, preds, labels = [], [], []
    for batch_data in tqdm(test_dataloader):
        batch_data = batch_data.to(device)
        generated_tokens = model.generate(
            batch_data["input_ids"],
            attention_mask=batch_data["attention_mask"],
            max_length=max_target_length,
        ).cpu().numpy()
        label_tokens = batch_data["labels"].cpu().numpy()

        decoded_sources = tokenizer.batch_decode(
            batch_data["input_ids"].cpu().numpy(),
            skip_special_tokens=True,
            use_source_tokenizer=True
        )
        decoded_preds = tokenizer.batch_decode(generated_tokens, skip_special_tokens=True)
        label_tokens = np.where(label_tokens != -100, label_tokens, tokenizer.pad_token_id)
        decoded_labels = tokenizer.batch_decode(label_tokens, skip_special_tokens=True)

        sources += [source.strip() for source in decoded_sources]
        preds += [pred.strip() for pred in decoded_preds]
        labels += [[label.strip()] for label in decoded_labels]
    bleu_score = bleu.corpus_score(preds, labels).score
    print(f"Test BLEU: {bleu_score:>0.2f}\n")
    results = []
    print('saving predicted results...')
    for source, pred, label in zip(sources, preds, labels):
        results.append({
            "sentence": source,
            "prediction": pred,
            "translation": label[0]
        })
    with open('test_data_pred.json', 'wt', encoding='utf-8') as f:
        for exapmle_result in results:
            f.write(json.dumps(exapmle_result, ensure_ascii=False) + '\n')
Using cuda device
evaluating on test set...
100%|██████████| 1229/1229 [21:18<00:00,  1.04s/it]
Test BLEU: 54.87
可以看到,经过微调,模型在测试集上的 BLEU 值从 42.61 上升到 54.87,证明了我们对模型的微调是成功的。
我们打开保存预测结果的 test_data_pred.json,其中每一行对应一个样本,sentence 对应原文,prediction 对应模型的翻译结果,translation 对应标注的翻译文本。
{
  "sentence": "▁大连是中国最美丽的城市之一。",
  "prediction": "Dalian is one of China's most beautiful cities.",
  "translation": "E. g. Dalian is one of the most beautiful cities in China."
}
...
至此,我们使用 Transformers 库进行翻译任务就全部完成了!
4. 关于解码
在本文中,我们使用 AutoModelForSeq2SeqLM 模型自带的 generate() 函数,通过柱搜索 (Beam search) 解码出翻译结果(使用模型默认解码参数)。实际上所有 Transformers 库中的生成模型都可以通过 generate() 函数来完成解码,只需要向其传递不同的参数。
下面我们将简单介绍目前常用的几种解码策略。
自回归语言生成
我们先回顾一下自回归 (auto-regressive) 语言生成的过程。自回归语言生成假设每个词语序列的概率都可以分解为一系列条件词语概率的乘积:
\[P(w_{1:T}\mid W_0) = \prod_{t=1}^T P(w_t\mid w_{1:t-1}, W_0), \quad w_{1:0} = \varnothing\]这样就可以迭代地基于上下文 $W_0$ 以及已经生成的词语序列 $w_{1:t-1}$ 来预测序列中的下一个词 $w_t$,因此被称为自回归 (auto-regressive)。生成序列的长度 $T$ 通常不是预先确定的,而是当生成出休止符(EOS token)时结束迭代。
Transformers 库中所有的生成模型都提供了用于自回归生成的 generate() 函数,例如 GPT2、XLNet、OpenAi-GPT、CTRL、TransfoXL、XLM、Bart、T5 等等。
下面我们将介绍目前常用的四种解码方式:
- 贪心搜索 (Greedy Search)
- 柱搜索 (Beam search)
- Top-K 采样 (Top-K sampling)
- Top-p 采样 (Top-p sampling)。
为了方便,我们将统一使用 GPT-2 模型来进行展示。
from transformers import AutoTokenizer, AutoModelForCausalLM

tokenizer = AutoTokenizer.from_pretrained("gpt2")

# add the EOS token as PAD token to avoid warnings
model = AutoModelForCausalLM.from_pretrained("gpt2", pad_token_id=tokenizer.eos_token_id)
贪心搜索
贪心搜索 (Greedy Search) 在每轮迭代时,即在时间步 $t$,简单地选择概率最高的下一个词作为当前词,即 $w_t = \text{argmax}_w P(w\mid w_{1:t-1})$。下图展示了一个贪心搜索的例子:
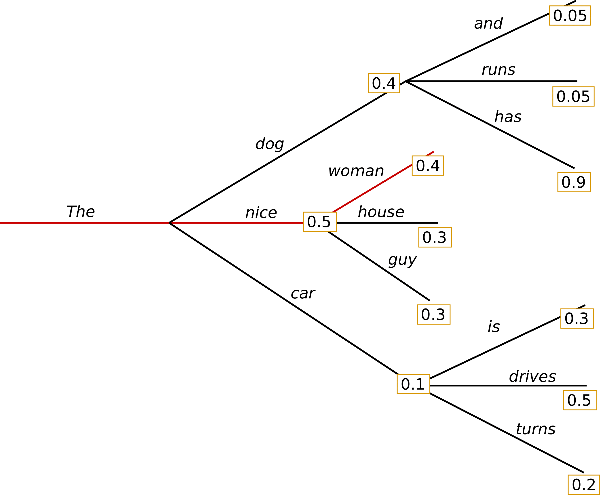
可以看到,从起始词语“The”开始,贪心算法不断地选择概率最高的下一个词直至结束,最后生成词语序列 (“The” “nice” “woman”),其整体概率为 $0.5 \times 0.4 = 0.2$。
下面我们使用 GPT-2 模型结合贪心算法来为上下文 (“I”, “enjoy”, “walking”, “with”, “my”, “cute”, “dog”) 生成后续序列:
# encode context the generation is conditioned on
input_ids = tokenizer.encode('I enjoy walking with my cute dog', return_tensors='pt')

# generate text until the output length (which includes the context length) reaches 50
greedy_output = model.generate(input_ids, max_length=50)

print("Output:\n" + 100 * '-')
print(tokenizer.decode(greedy_output[0], skip_special_tokens=True))
Output:
----------------------------------------------------------------------------------------------------
I enjoy walking with my cute dog, but I'm not sure if I'll ever be able to walk with my dog. I'm not sure if I'll ever be able to walk with my dog.

I'm not sure if I'll
模型成功地生成了一个短文本,但是它似乎开始不停地重复。这是一个语言生成中常见的问题,特别是在贪心搜索和柱搜索中经常会出现。
贪心搜索最大的问题是由于每次都只选择当前概率最大的词,相当于是区部最优解,因此生成的序列往往并不是全局最优的。例如在上图中,词语序列 (“The”, “dog”, “has”) 的概率是 $0.4 \times 0.9 = 0.36$,而这个序列无法通过贪心算法得到。
柱搜索
柱搜索 (Beam search) 在每个时间步都保留 num_beams 个最可能的词,最终选择整体概率最大的序列作为结果。下图展示了一个 num_beams=2 的例子:
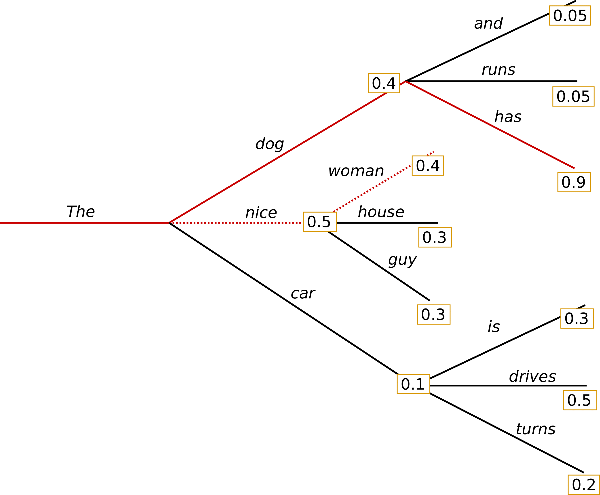
可以看到,在第一个时间步,柱搜索同时保留了概率最大的前 2 个序列:概率为 $0.4$ 的 (”The“, ”dog“) 和概率为 $0.5$ 的 (”The“, ”nice“);在第二个时间步,柱搜索通过计算继续保留概率最大的前 2 个序列:概率为 $0.4 \times 0.9=0.36$ 的 (”The“, ”dog“, ”has“) 和概率为 $0.5 \times 0.4=0.2$ 的 (”The“, ”nice“, ”woman“);最终选择概率最大的序列 (”The“, ”dog“, ”has“) 作为结果。
柱搜索虽然通过在每个时间步保留多个分支来缓解贪心算法局部最优解的问题,但是它依然不能保证找到全局最优解。
下面我们同样运用 GPT-2 模型结合柱搜索来生成文本,只需要设置参数 num_beams > 1 以及 early_stopping=True,这样只要所有柱搜索保留的分支都到达休止符 EOS token,生成过程就结束。
# activate beam search and early_stopping
beam_output = model.generate(
    input_ids,
    max_length=50,
    num_beams=5,
    early_stopping=True
)

print("Output:\n" + 100 * '-')
print(tokenizer.decode(beam_output[0], skip_special_tokens=True))
Output:
----------------------------------------------------------------------------------------------------
I enjoy walking with my cute dog, but I'm not sure if I'll ever be able to walk with him again.

I'm not sure if I'll ever be able to walk with him again. I'm not sure if I'll
虽然柱搜索得到的序列更加流畅,但是输出中依然出现了重复片段。最简单的解决方法是引入 n-grams 惩罚,其在每个时间步都手工将那些会产生重复 n-gram 片段的词的概率设为 0。例如,我们额外设置参数 no_repeat_ngram_size=2 就能使生成序列中不会出现重复的 2-gram 片段:
# set no_repeat_ngram_size to 2
beam_output = model.generate(
    input_ids,
    max_length=50,
    num_beams=5,
    no_repeat_ngram_size=2,
    early_stopping=True
)

print("Output:\n" + 100 * '-')
print(tokenizer.decode(beam_output[0], skip_special_tokens=True))
Output:
----------------------------------------------------------------------------------------------------
I enjoy walking with my cute dog, but I'm not sure if I'll ever be able to walk with him again.

I've been thinking about this for a while now, and I think it's time for me to take a break
不过 n-grams 惩罚虽然能够缓解“重复”问题,却也要谨慎使用。例如对于一篇关于”New York“文章就不能使用 2-gram 惩罚,否则”New York“在全文中就只能出现一次了。
柱搜索会在每个时间步都保留当前概率最高的前 num_beams 个序列,因此我们还可以通过设置参数 num_return_sequences(<= num_beams)来返回概率靠前的多个序列:
# set return_num_sequences > 1
beam_outputs = model.generate(
    input_ids,
    max_length=50,
    num_beams=5,
    no_repeat_ngram_size=2,
    num_return_sequences=3,
    early_stopping=True
)

# now we have 3 output sequences
print("Output:\n" + 100 * '-')
for i, beam_output in enumerate(beam_outputs):
    print("{}: {}\n\n".format(i, tokenizer.decode(beam_output, skip_special_tokens=True)))
Output:
----------------------------------------------------------------------------------------------------
0: I enjoy walking with my cute dog, but I'm not sure if I'll ever be able to walk with him again.

I've been thinking about this for a while now, and I think it's time for me to take a break


1: I enjoy walking with my cute dog, but I'm not sure if I'll ever be able to walk with him again.

I've been thinking about this for a while now, and I think it's time for me to get back to


2: I enjoy walking with my cute dog, but I'm not sure if I'll ever be able to walk with her again.

I've been thinking about this for a while now, and I think it's time for me to take a break
由于柱大小只被设为 5,因此最终获得的 3 个序列看上去非常接近。
有趣的是,人类语言似乎并不遵循下一个词是最高概率的分布,换句话说,真实的人类语言具有高度的随机性,是不可预测的。下图展示了人类语言与柱搜索在每个时间步词语概率的对比:
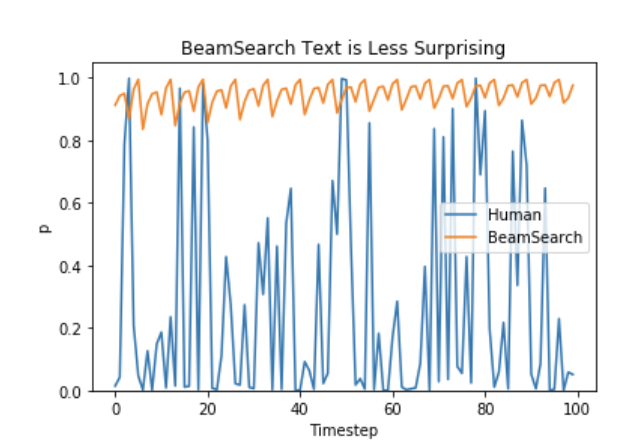
因此,柱搜索更适用于机器翻译或摘要等生成序列长度大致可预测的任务,而在对话生成、故事生成等开放式文本生成任务 (open-ended generation) 上表现不佳。虽然通过 n-gram 或者其他惩罚项可以缓解“重复”问题,但是如何控制”不重复”和“重复”之间的平衡又非常困难。
所以,对于开放式文本生成任务,我们需要引入更多的随机性——这就是采样方法。
随机采样
采样 (sampling) 最基本的形式就是从当前上下文的条件概率分布中随机地选择一个词作为下一个词,即:
\[w_t \sim P(w\mid w_{1:t-1})\]对于前面图中的例子,一个基于采样的生成过程可能为(采样生成的结果不是唯一的):

这里“car”是从条件概率分布 $P(w\mid \text{“The”})$ 中采样得到,而“drives”是从分布 $P(w\mid \text{“The”, “car”})$ 中采样得到。
在 Transformers 库中,我们只需要在 generate() 中设置 do_sample=True 并且令 top_k=0 禁用 Top-K 采样就可以实现随机采样:
# set seed to reproduce results. Feel free to change the seed though to get different results
torch.manual_seed(0)

# activate sampling and deactivate top_k by setting top_k sampling to 0
sample_output = model.generate(
    input_ids,
    do_sample=True,
    max_length=50,
    top_k=0
)

print("Output:\n" + 100 * '-')
print(tokenizer.decode(sample_output[0], skip_special_tokens=True))
Output:
----------------------------------------------------------------------------------------------------
I enjoy walking with my cute dog along the seven mile loop along Green Bay's Skagit River. In the central part of Monroe County about 100 miles east of sheboygan, it is almost deserted. But along the way there are often carefully
看上去还不错,但是细读的话会发现不是很连贯,这也是采样生成文本的通病:模型经常会生成前后不连贯的片段。一种解决方式是通过降低 softmax 的温度 (temperature) 使得分布 $P(w\mid w_{1:t-1})$ 更尖锐,即进一步增加高概率词出现的可能性和降低低概率词出现的可能性。例如对上面的例子应用降温:

这样在第一个时间步,条件概率变得更加尖锐,几乎不可能会选择到“car”。我们只需要在 generate() 中设置 temperature 来就可以实现对分布的降温:
# set seed to reproduce results. Feel free to change the seed though to get different results
torch.manual_seed(0)

# use temperature to decrease the sensitivity to low probability candidates
sample_output = model.generate(
    input_ids,
    do_sample=True,
    max_length=50,
    top_k=0,
    temperature=0.6
)

print("Output:\n" + 100 * '-')
print(tokenizer.decode(sample_output[0], skip_special_tokens=True))
Output:
----------------------------------------------------------------------------------------------------
I enjoy walking with my cute dog, but it's pretty much impossible to get the best out of my dog.

Pinky is a bit of a big she-wolf, but she is pretty much the most adorable of all the wolves.
可以看到生成的文本更加连贯了。降温操作实际上是在减少分布的随机性,当我们把 temperature 设为 0 时就等同于贪心解码。
Top-K 采样
类似于柱搜索,Top-K 采样在每个时间步都保留最可能的 K 个词,然后在这 K 个词上重新分配概率质量。例如我们对上面的示例进行 Top-K 采样,这里设置 $K=6$ 在每个时间步都将采样池控制在 6 个词。:
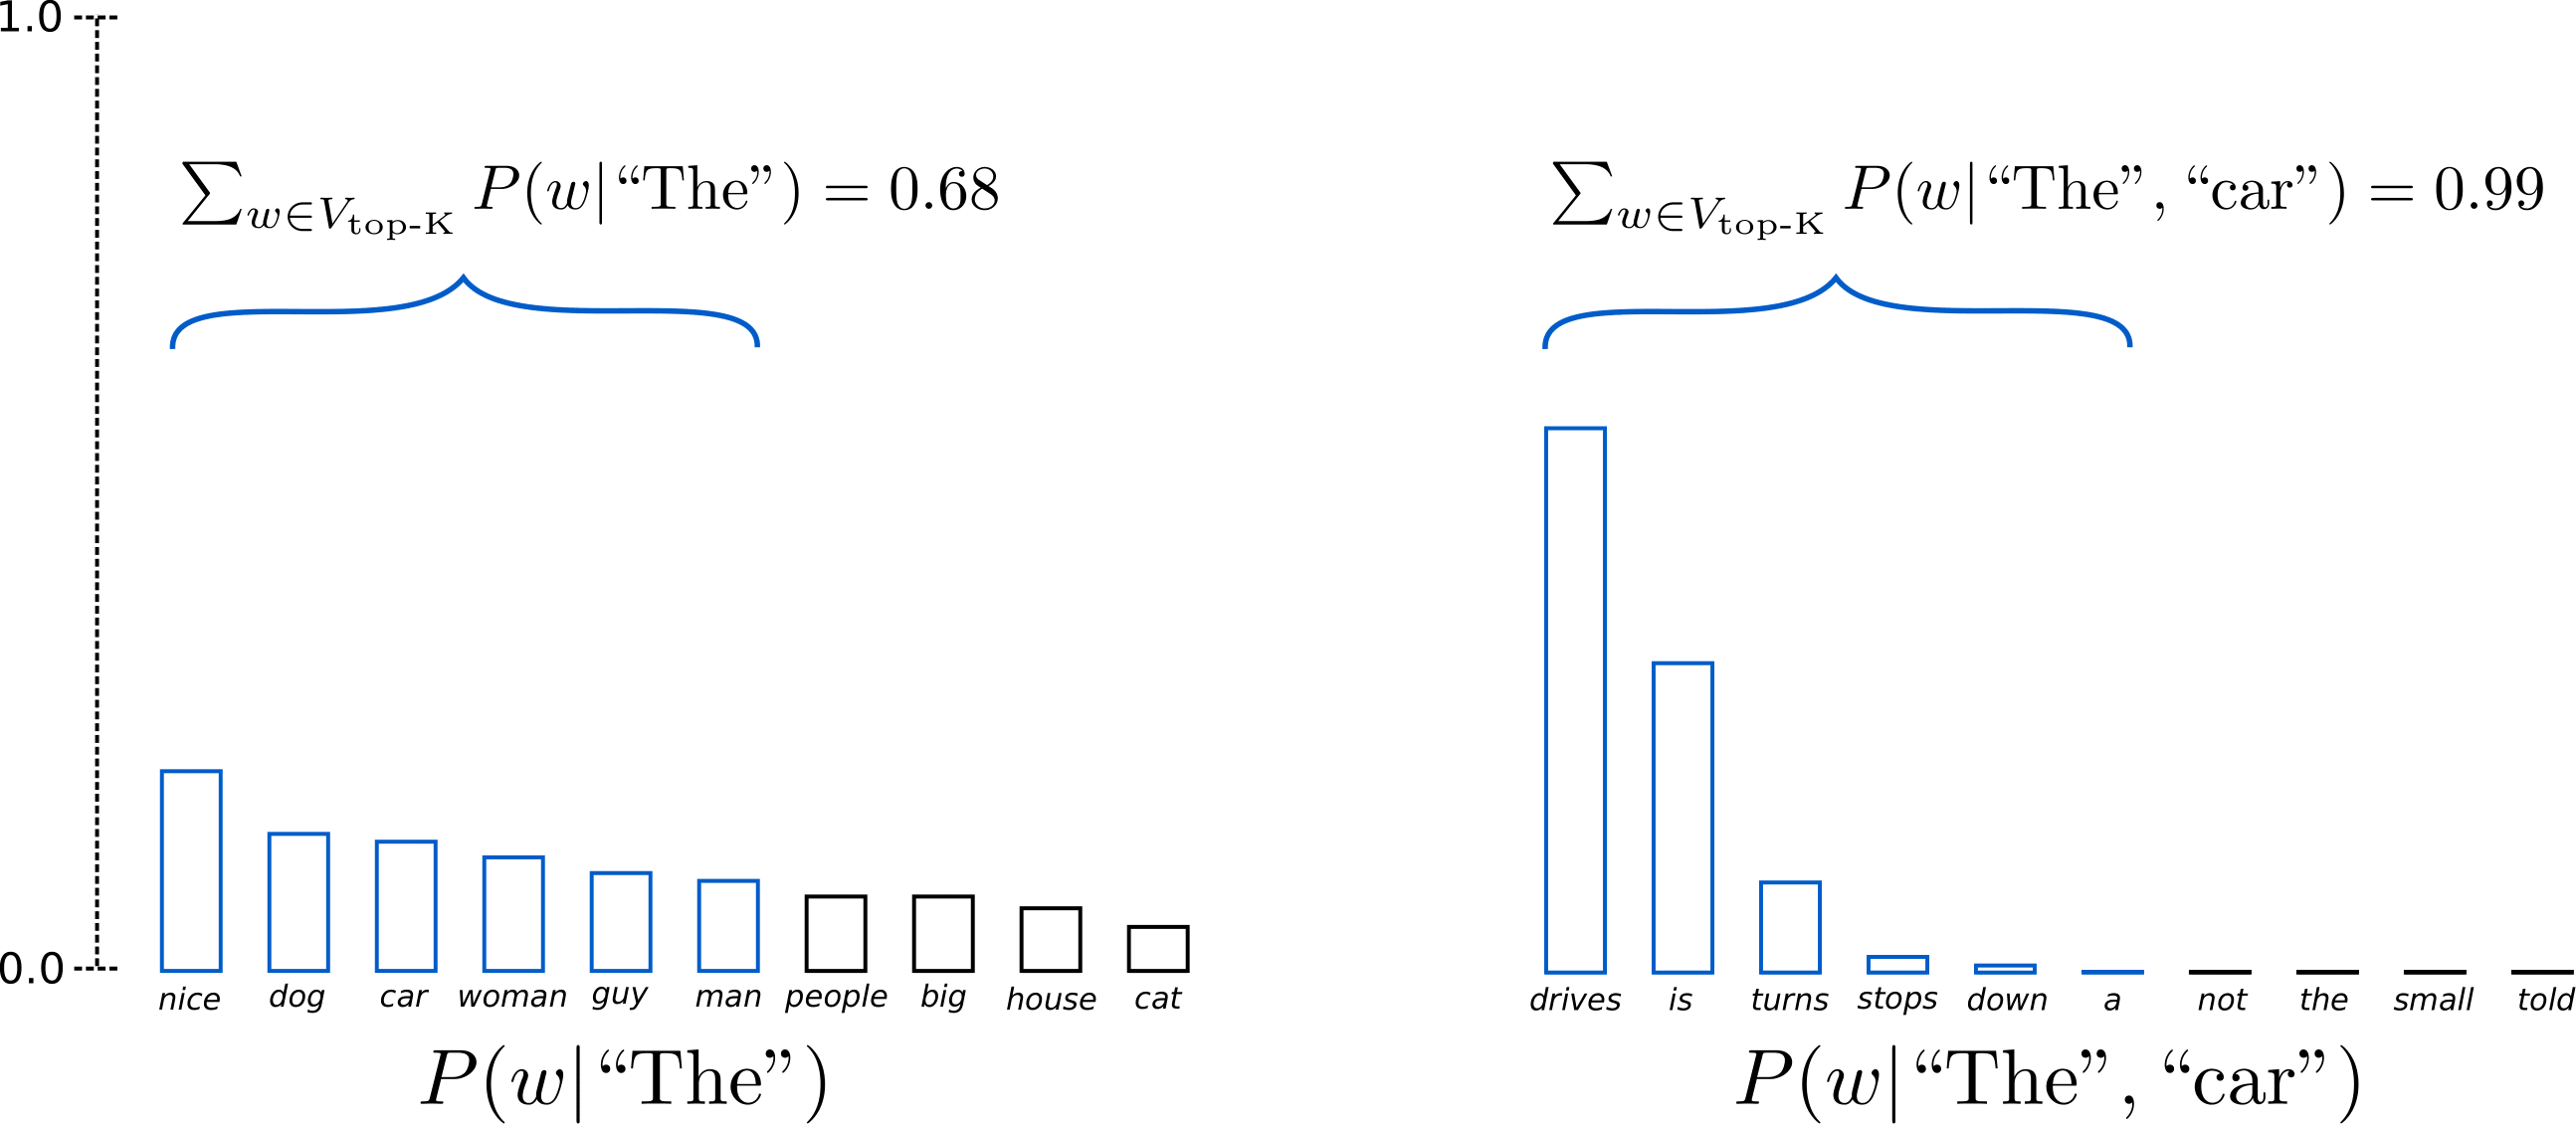
可以看到,6 个最可能的词(记为 $V_{\text{top-K}}$)虽然仅包含第一个时间步中整体概率质量的大约 $\frac{2}{3}$,但是几乎包含了第二个时间步中所有的概率质量。尽管如此,它还是成功地消除了第二步中那些奇怪的候选词(例如“not”、“the”、“small”、“told”)。
下面我们通过在 generate() 中设置 top_k=10 来进行 Top-K 采样:
# set seed to reproduce results. Feel free to change the seed though to get different results
torch.manual_seed(0)

# set top_k to 10
sample_output = model.generate(
    input_ids,
    do_sample=True,
    max_length=50,
    top_k=10
)

print("Output:\n" + 100 * '-')
print(tokenizer.decode(sample_output[0], skip_special_tokens=True))
Output:
----------------------------------------------------------------------------------------------------
I enjoy walking with my cute dog, but it's a bit of a pain in the ass to see that the dog does not get to walk with me.

I think my dog is just fine. But he needs some time to get used
Top-K 采样的一个问题是它无法动态调整每个时间步从概率分布 $P$ 中过滤出来的单词数量,这会导致有些词可能是从非常尖锐的分布(上图中右侧)中采样的,而其他单词则可能是从平坦的分布(上图中左侧)中采样的,从而无法保证生成序列整体的质量。
Top-p (nucleus) 采样
Top-p 对 Top-K 进行了改进,每次只从累积概率超过 $p$ 的最小的可能词集中进行选择,然后在这组词语中重新分配概率质量。这样,每个时间步的词语集合的大小就可以根据下一个词的条件概率分布动态增加和减少。下图展示了一个 Top-p 采样的例子:
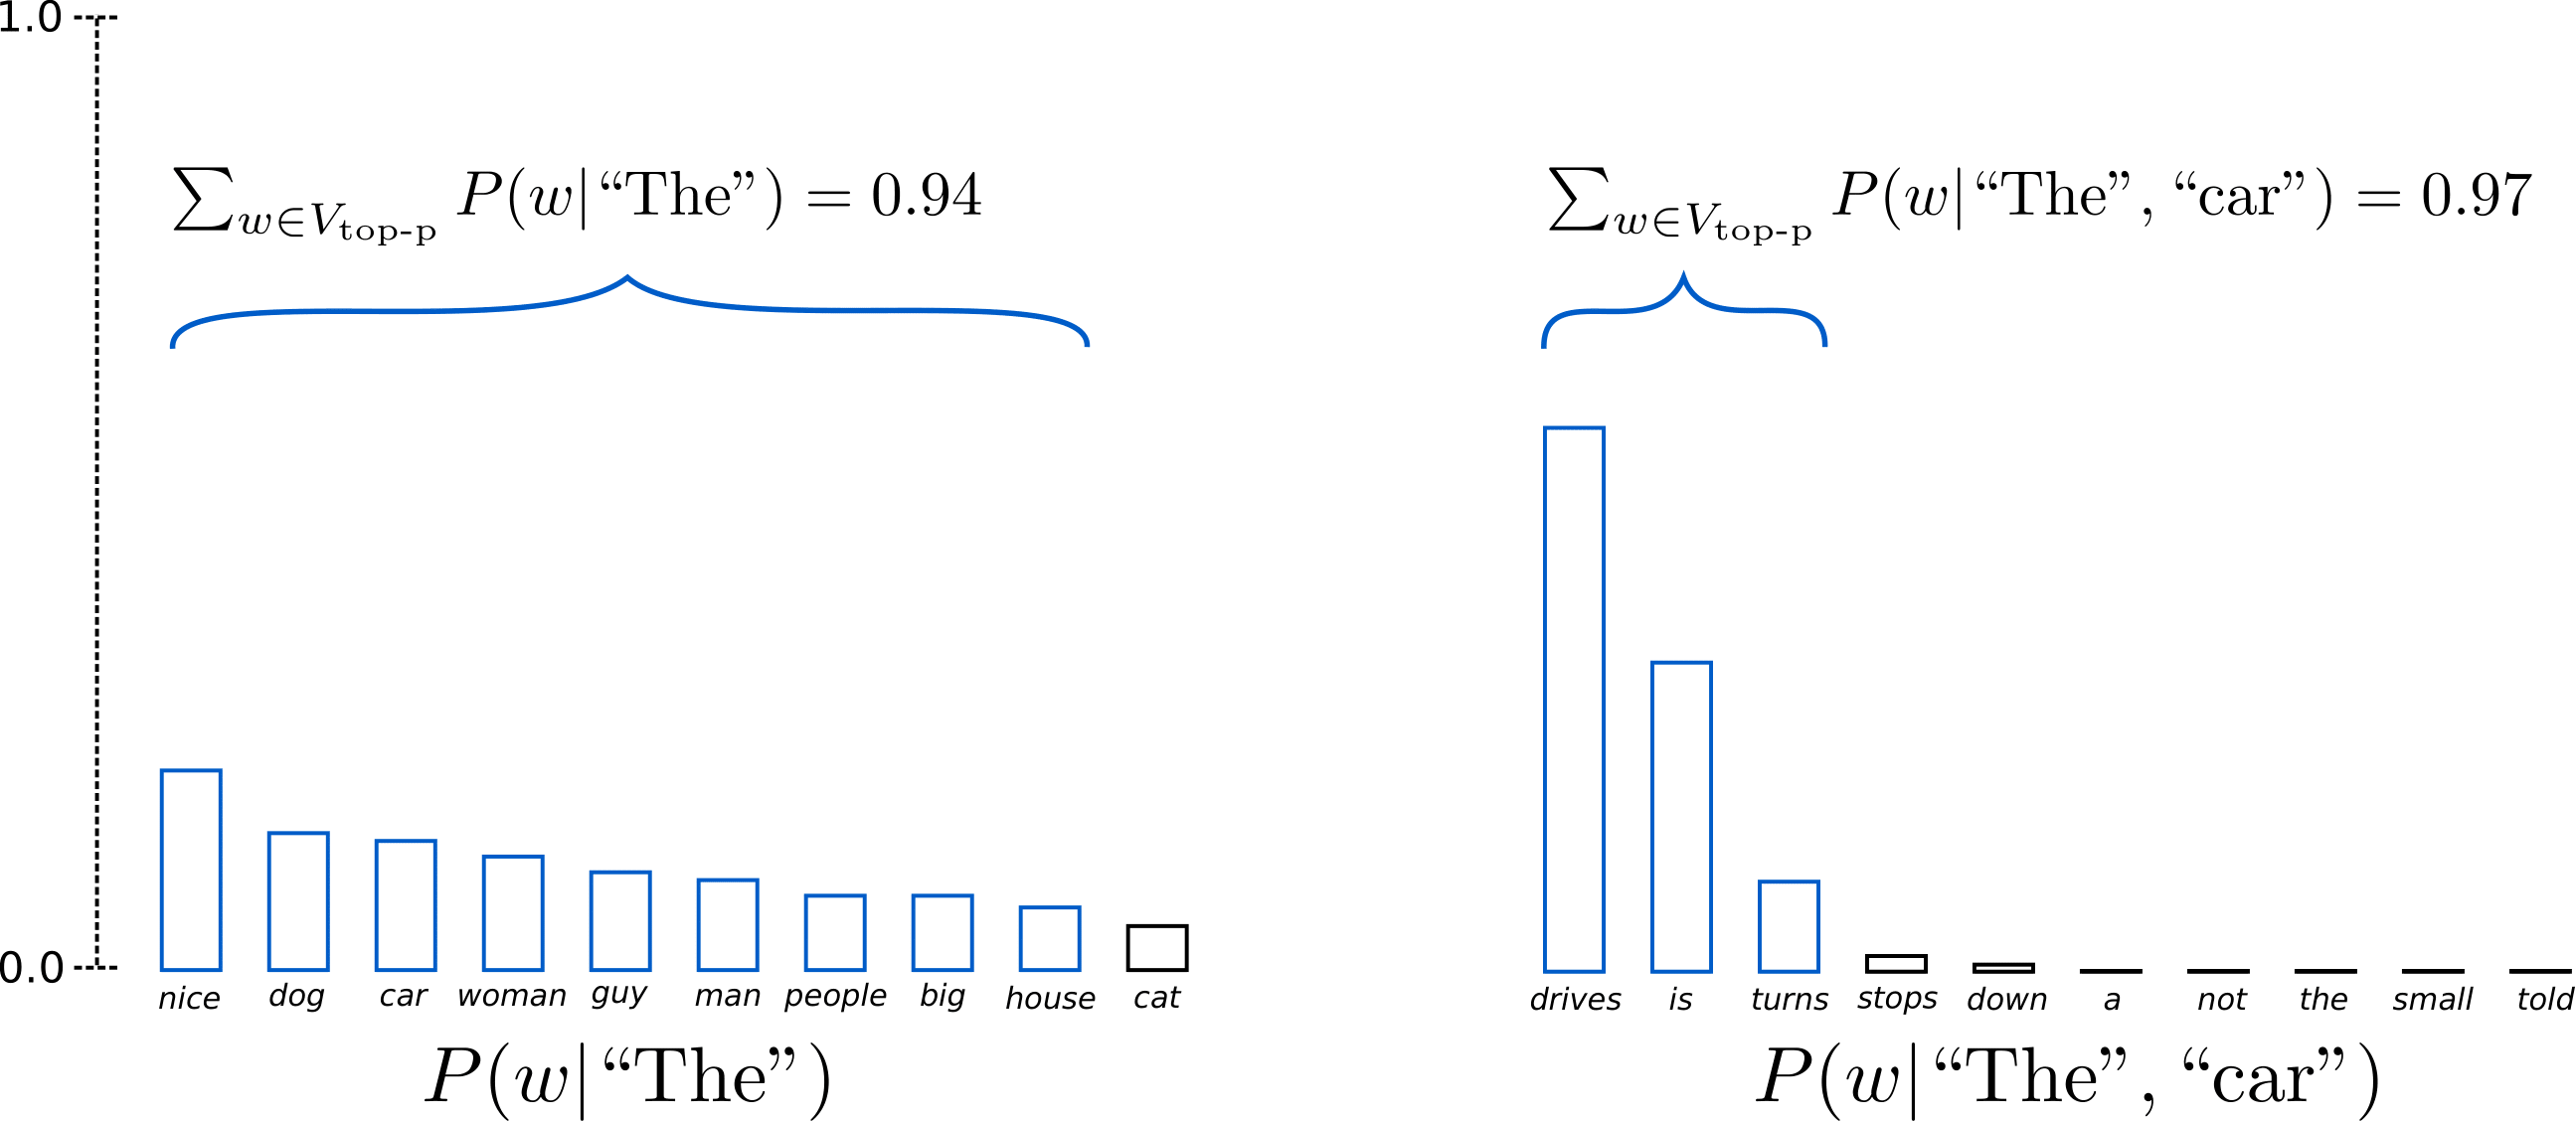
这里我们设置 $p=0.92$,Top-p 采样在每个时间步会在整体概率质量超过 92% 的最小单词集合(定义为 $V_{\text{top-p}}$)中进行选择。上图左边的例子中,Top-p 采样出了 9 个最可能的词语,而在右边的例子中,只选了 3 个最可能的词,整体概率质量就已经超过了 92%。可以看到,当下一个词难以预测时(例如 $P(w\mid \text{“The”})$),Top-p 采样会保留很多可能的词,而当下一个词相对容易预测时(例如 $P(w\mid \text{“The”, “car”})$),Top-p 就只会保留很少的词。
我们只需要在 generate() 中设置 0 < top_p < 1 就可以激活 Top-p 采样了:
# set seed to reproduce results. Feel free to change the seed though to get different results
torch.manual_seed(0)

# deactivate top_k sampling and sample only from 92% most likely words
sample_output = model.generate(
    input_ids,
    do_sample=True,
    max_length=50,
    top_p=0.92,
    top_k=0
)

print("Output:\n" + 100 * '-')
print(tokenizer.decode(sample_output[0], skip_special_tokens=True))
Output:
----------------------------------------------------------------------------------------------------
I enjoy walking with my cute dog along the Tokyo highway," said Beranito, 47, the man who moved to the new apartment in 2013 with his wife. "I liked to sit next to him on the roof when I was doing programming.
虽然理论上 Top-p 采样比 Top-K 采样更灵活,但是两者在实际应用中都被广泛采用,Top-p 甚至可以与 Top-K 共同工作,这可以在排除低概率词的同时还允许进行一些动态选择。
最后,与贪心搜索类似,为了获得多个独立采样的结果,我们设置 num_return_sequences > 1,并且同时结合 Top-p 和 Top-K 采样:
# set seed to reproduce results. Feel free to change the seed though to get different results
torch.manual_seed(0)

# set top_k = 50 and set top_p = 0.95 and num_return_sequences = 3
sample_outputs = model.generate(
    input_ids,
    do_sample=True,
    max_length=50,
    top_k=50,
    top_p=0.95,
    num_return_sequences=3
)

print("Output:\n" + 100 * '-')
for i, sample_output in enumerate(sample_outputs):
    print("{}: {}\n\n".format(i, tokenizer.decode(sample_output, skip_special_tokens=True)))
Output:
----------------------------------------------------------------------------------------------------
0: I enjoy walking with my cute dog, and she is the perfect animal companion to me. She helps me get on my feet as often as possible. I love sharing my love and care with all of my dogs. I have the highest respect for them


1: I enjoy walking with my cute dog when he is around my neck," she said. "I'm just doing it. It's not something that's easy for me to do when I'm the leader."

The family is just beginning to see


2: I enjoy walking with my cute dog, and we are both very pleased by his behavior. He seems to be extremely curious about the world around him, and just as he is searching for his place of origin he is able to spot and find it easily
代码
与之前一样,我们按照功能将翻译模型的代码拆分成模块并且存放在不同的文件中,整理后的代码存储在 Github:
How-to-use-Transformers/src/seq2seq_translation/
运行 run_translation_marian.sh 脚本即可进行训练。如果要进行测试或者将模型输出的翻译结果保存到文件,只需把脚本中的 --do_train 改成 --do_test 或 --do_predict。
经过 3 轮训练,最终 Marian 模型在测试集上的 BLEU 值为 54.87%(Nvidia Tesla V100, batch=32)。
参考
[1] HuggingFace 在线教程
[2] Pytorch 官方文档
[3] Transformers 官方文档
[4] HuggingFace 博文《How to generate text》